
The principle: sensors go where water sits, not where it starts
A point sensor is a pair of contacts that close when water bridges them. It does not see a pinhole inside a wall or a running toilet; a flow monitor on the main does that, and our smart shutoff valve guide covers those. What a sensor does is catch the appliance failures that cause most of the water losses we dry out, and it only catches them if it is sitting in the first puddle.
So the rule for every spot below is the same: find the lowest point of the floor within a foot of the appliance, where water will pool before it spreads, and put the contacts there. On a level slab that is usually directly under the fitting that fails. On a floor with any slope, it is the downhill side. Pour half a cup of water where you think the leak would start and watch where it goes; that is where the sensor goes.
Order matters because budgets are finite. Homeowners put the first sensor under the kitchen sink, where they would smell a leak within a day anyway. Start where the losses are big and silent.
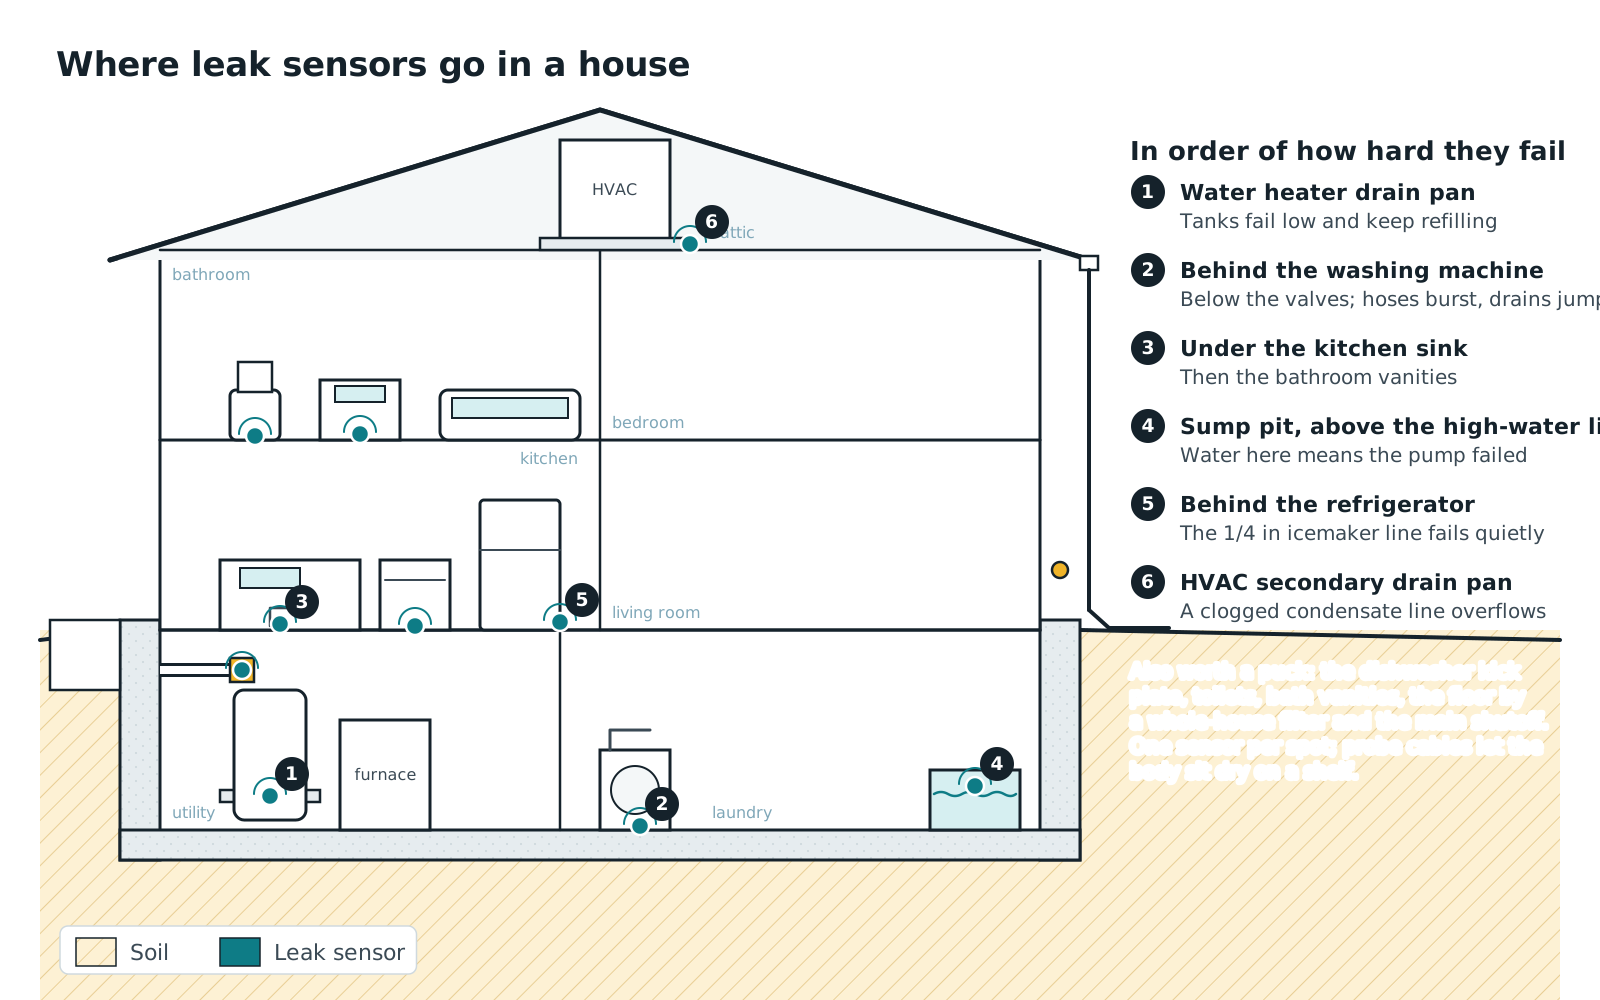
The first six, in order
1. Water heater drain pan
A tank water heater fails at the bottom seam and then keeps refilling itself from the cold inlet, so a 50-gallon tank can put several hundred gallons on the floor overnight. The sensor goes in the pan, contacts down on the pan floor, on the side away from the burner access. If there is no pan, put it on the floor at the base of the tank on the downhill side. If the pan has a drain line, pour a cup of water in and confirm the line actually goes somewhere; half the pans we see drain to a capped stub. A probe-cable sensor is ideal here: the body sits on the tank's top or a shelf, the probe lies in the pan. Add a second sensor under the temperature-and-pressure relief discharge pipe if it ends over the floor rather than in the pan. Our water heater emergency guide covers what to do when this one fires.
2. Washing machine
Behind or under the washer, on the floor directly below the two supply valves and the drain standpipe. Supply hoses burst under constant pressure, the drain hose jumps out of the standpipe during a spin cycle, and the pump seal weeps. A probe cable earns its keep: the sensor body sits on the shelf above the machine where you can reach the battery, the probe snakes down behind the machine to the floor. If the washer is in a pan, the probe goes in the pan. On a second floor, this sensor should be the one that closes the main (see pairing with a shutoff, below), because the ceiling below is the expensive part.
3. Sump pit, above the high-water line
This is the sensor that tells you the pump has failed before the floor does. Mount the sensor on the pit wall or hang a probe disc on a cord from the lid so the contacts sit 1 to 2 in. above the level at which the primary pump normally turns on, and below the lid. Too low and it alarms every cycle; too high and the floor is wet first. If there is a battery backup, set the sensor between the primary's turn-on level and the backup's; then an alert means the primary quit and the backup is carrying the house. The pit is a Wi-Fi dead zone under a slab, which is why this is the spot that justifies a long-range hub radio. The battery backup roundup covers the dedicated high-water alarms that come with backup systems.
4. Under the kitchen sink
At the back of the cabinet, under the trap, where a weeping compression nut or a dishwasher supply drip lands. Kitchen first, because the dishwasher supply, the disposal and the filter housing all share that cabinet; bathrooms after. Set the puck flat on the cabinet floor, not on top of the bottles. If the cabinet floor is particleboard, it will swell before the sensor sees anything if the puck is in the wrong corner; pour the half cup and find the low spot.
5. Behind the refrigerator
The icemaker and dispenser line is 1/4 in. plastic or copper, and it fails quietly behind an appliance nobody moves for years. The sensor goes on the floor behind the fridge, near the wall where the line comes out of the saddle valve or the box. A probe cable lets you fish it in without pulling the fridge; a puck can go in when you clean the coils. If the fridge sits on hardwood, this is the sensor that saves the floor.
6. Attic or closet air handler pan
A clogged condensate line overflows the secondary drain pan under the air handler, and by the time the ceiling below stains, the drywall is finished. A probe disc in the pan beats the float switch that nobody has tested since the install. Put the sensor body where you can reach it from the attic hatch and run the probe to the low corner of the pan. If the air handler is in a closet on a slab, the puck goes on the floor beside the unit on the downhill side.
The second tier
Once the six are covered, add sensors here in roughly this order, depending on your house:
- Dishwasher kick plate. On the floor under the front edge of the dishwasher; a probe cable slides under the toe kick. Pump seals and door gaskets leak slowly for weeks.
- Toilets. On the floor behind the bowl, under the supply valve and the fill-line connection. The plastic nut on a braided supply line and the wax ring are the failures; a second-floor toilet supply is a top-three loss on our books.
- Bathroom vanities. Same as the kitchen sink, lower priority because you are in there daily.
- Main shutoff and pressure regulator. A puck on the floor under the main valve catches a weeping PRV or a failed union before it stains the slab. If the main is in a crawl space, this is where the crawl space sensor goes.
- Boiler, water softener, whole-house filter. All have housings and relief valves that let go. A puck at the base of each.
- Basement floor drain. A sensor beside the drain catches a sewer backup coming up before it crosses the floor. Not in the drain; beside it, on the uphill side so it is not the first thing fouled.
- Crawl space low point. One sensor at the lowest spot of the vapor barrier, and one near any plumbing manifold. Long-range radio required.
- Window wells and walkout thresholds. On the floor inside, where the water comes in. These are the only spots where a sensor is watching for outside water.
A typical house ends up with six to ten sensors. Count the appliances and fixtures above that you actually have; that is your number.
Positioning each sensor
- 1
Find the low spot with half a cup of water
Before you set a sensor, pour half a cup of water where the leak would start and watch where it pools. Floors are rarely level; a sensor 8 in. uphill of the puddle will not see it for hours. Dry the spot and put the contacts exactly where the water collected.
- 2
Contacts down, body dry
A puck sensor's contacts are on the bottom; set it flat on the floor, not on a mat or a rag, and not on its side. A probe-cable sensor keeps its electronics and battery above the water: the body goes on a shelf, the tank top or a cabinet wall, and the probe or sensing disc lies in the pan or on the floor. Rope-style sensing cables (the Eve Water Guard's 6.5-ft cable, extendable) lie along a wall or around a base; any wet point along the length triggers them.
- 3
Keep it reachable
You will change the battery in two to five years and press the test button yearly. If the puck is behind a 300-lb refrigerator, use a probe cable and leave the body where you can reach it. Label each sensor in the app with its location ('WH pan', 'Washer', 'Sump') so an alert at 3 a.m. tells you where to run.
- 4
Check the radio before you commit
Set the sensor in its spot, close the appliance door or the pit lid, and trigger it with a wet paper towel. If the alert does not arrive on your phone within a minute, the radio is not reaching the hub or router. Sump pits under slabs, crawl spaces and detached garages are where pure Wi-Fi sensors drop off; a hub-based long-range system (YoLink's LoRa, Govee's 915 MHz gateway) or a Z-Wave mesh (Ring) is the fix, not moving the sensor somewhere drier.
- 5
Set up alert routing
A push notification does not wake a sleeping house. Turn on every channel the app offers (push, SMS, email, and for Moen and some hub systems, a phone call), add a second household member, and set the local siren to on. For the water heater, washer and sump sensors, consider the shutoff pairing below.
- 6
Write the date on it and calendar the test
Put the battery date on the sensor with a marker and a yearly reminder in your phone to touch a wet towel to each one. Battery life ranges from about two years (Moen's detector on a CR123A) to five-plus (YoLink's and Govee's AAA sensors); the app's battery readout is useful only if you look at it.
How many sensors, and which system
Buy for the six spots first, then the second tier that applies to your house. Multi-packs make that cheap: the Govee 1s gateway kit and the YoLink starter kit each come with three sensors and a hub, and both report five-year battery life with add-on sensors available singly.
Pick the system by the worst radio location in the house:
- Sump pit, crawl space, detached garage or outbuilding: YoLink. Its LoRa sensors are rated to a quarter mile open-air to the hub and we have seen them report from pits under slabs. The same hub runs YoLink's valve controller, which closes the main.
- A large house with a basement laundry and no outbuildings: Govee's 1s kit; 1,804 ft rated range to its gateway, a 105 dB siren on each sensor, three sensors in the box.
- Already on Ring Alarm: Ring's Flood and Freeze Sensor rides the Z-Wave mesh you already have and adds freeze alerts.
- A Moen Flo on the main: Moen's Smart Water Detector, a no-hub Wi-Fi sensor with a probe cable, temperature and humidity, that can tell the Flo to close the valve.
- Apple Home: Eve Water Guard, a plug-in sensing cable for a long run along a basement wall or around a mechanical room.
- No apps, a rental, an occupied room: the Zircon Leak Alert, a 90 dB local alarm on a 9 V battery. It will not text you, but it will be heard.
The leak detector roundup scores all six on battery life, radio, probe cable, siren and freeze alerts.
Pairing sensors with a shutoff valve
A sensor that can close the main turns a 3 a.m. alert into a 3 a.m. puddle instead of a 7 a.m. lake. Three ways to do it: Moen's detector triggers a Moen Flo; YoLink's sensors trigger the YoLink valve controller, which bolts onto your existing quarter-turn ball valve and runs on batteries through an outage; and Phyn's and Resideo's systems take their own sensors. Set the shutoff rule on the sensors that guard unattended, high-volume failures (water heater, washer, main shutoff) and leave it off for a bathroom vanity where a wet puck from a mopped floor would shut the house down. Our shutoff valve roundup and the Moen Flo vs Phyn comparison cover the valve side.
Freeze sensors are a placement question too
Burst pipes from freezing are the single most expensive residential water loss we see, and they happen where nobody is standing: garages, crawl spaces, cabins, the kitchen wall on the north side. A sensor with a temperature alert (Ring's, Moen's) goes where the pipe is coldest, not where it is convenient: at the hose bib's interior shutoff, in the crawl space near the supply manifold, in the garage by the utility sink. Set the alert at 38°F so you have time to open cabinet doors and start a drip before the pipe reaches 32°F.
YoLink Water Leak Starter Kit (Hub + 3 Water Leak Sensor 1)
Quarter-mile LoRa sensors that can also close your main.
Score breakdown
| Battery life | 60 | 10.0 |
| Phone alerts | true | 10.0 |
| Radio reliability | lora | 9.0 |
| Freeze warning | n/a | — |
| Probe cable | false | 0.0 |
| Local siren | n/a | — |
| Temperature and humidity logging | n/a | — |
| Warranty | n/a | — |
| No hub needed | true | 6.0 |
- LoRa radio rated to a quarter mile open air; reaches pits and crawl spaces
- Five-plus-year battery life on two AAA cells
- IP68 housing
- Same sensors trigger YoLink's valve controller, even offline
- Hub works on Ethernet or 2.4 GHz Wi-Fi
- Hub required, and it needs internet for app alerts
- No siren rating published and no extension probe on Sensor 1
- No temperature or humidity data
- Warranty not published on the datasheet
YoLink built its system on LoRa, the same long-range, low-power radio utilities use for meter reading, and it shows in the places these sensors work: sump pits under a slab, crawl spaces behind a block foundation, pump houses a hundred feet from the router. YoLink rates the Water Leak Sensor 1 at a quarter mile of open-air range to the hub. Nothing on Wi-Fi comes close.
The sensor itself is a small IP68 puck with two sets of electrodes on the bottom, powered by two AAA batteries that YoLink rates for five-plus years. The kit's hub connects by Ethernet or 2.4 GHz Wi-Fi and pushes alerts to the app. YoLink lists an indoor operating range of 32°F to 122°F, so in an unheated pit it is the batteries and the pipe you worry about, not the sensor.
The real reason we steer homeowners here is the upgrade path. Add YoLink's valve controller later and the same sensors close the main through local device-to-device pairing, with the power out and the internet down. No other sensor at this price can do that.
Weak points: the datasheet does not list a siren rating, there is no extension cable on this model (YoLink's Sensor 2 adds a probe), no temperature reporting, and YoLink did not publish a warranty for the sensor where we could verify it. The hub is required and needs internet for full function.
Buy this kit if your risk points are far from the router or you plan to add automatic shutoff. Buy Govee if you want a louder local alarm in a compact house.
We don't copy Amazon reviews. Read customer reviews on Amazon (paid link).
GoveeLife Smart Water Leak Detector 1s (Gateway + 3 sensors)
Five-year batteries, a 105 dB siren and 1,800 ft of reach for the price of dinner.
Score breakdown
| Battery life | 60 | 10.0 |
| Phone alerts | true | 10.0 |
| Radio reliability | proprietary hub | 7.0 |
| Freeze warning | n/a | — |
| Probe cable | false | 0.0 |
| Local siren | 105 | 8.8 |
| Temperature and humidity logging | n/a | — |
| Warranty | n/a | — |
| No hub needed | true | 6.0 |
- Up to five-year battery life on two AAA cells
- 105 dB adjustable siren plus app and email alerts
- 915 MHz link to the gateway rated to 1,804 ft
- IP67 sensors survive sitting in a puddle
- Gateway included in the 3-sensor kit
- Requires the Govee gateway on 2.4 GHz Wi-Fi
- No temperature or humidity sensing, so no freeze warning
- No extension cable in the base kit
- Warranty term not published on the product page
Govee's 1s kit is three IP67 sensors and a small 2.4 GHz Wi-Fi gateway. The sensors do not use Wi-Fi themselves; they talk to the gateway on 915 MHz, which Govee rates at up to 550 m (1,804 ft) of monitoring range. In a house that means a sensor in the crawl space or a detached garage still reports, where a Wi-Fi puck would have dropped off the network months ago.
Each sensor runs on two AAA alkalines (six come in the box) and Govee states a battery life of up to five years. The onboard siren is adjustable in four steps to 105 dB, loud enough to hear from upstairs with the furnace running, and the app pushes notifications and email when the dual probes bridge. Govee claims detection of drips and floods within two seconds, which matches what we see when we test sensors with a wet rag.
What the base kit lacks is an extension cable (Govee sells a cabled variant separately) and any temperature or humidity reporting, so it will not warn you about a pipe about to freeze. Govee did not publish a warranty term on the product page.
At roughly $50-$70 for gateway plus three sensors, it is the cheapest way to cover a water heater, a washer and a kitchen sink with loud local alarms and phone alerts. Buy it if you want the most coverage per dollar and do not need freeze warnings. Buy YoLink if you need a quarter-mile radio or want sensors that can close a valve.
We don't copy Amazon reviews. Read customer reviews on Amazon (paid link).
When sensors are not enough, and when to call
Sensors catch puddles. They do not catch a pinhole in a copper line inside a wall, a slab leak, a toilet flapper running all night, or a supply line in the ceiling; for those you need a flow- or pressure-monitoring valve on the main. If your water bill climbed with no change in habits, or a wall or floor is warm or damp with no appliance near it, skip the sensors and start with a moisture meter and a plumber.
And if a sensor has already fired and you are standing in water: shut the main, kill power to the wet area if it is safe, and start drying within the first day. Our 72-hour dry-out guide is the sequence; the form below reaches a local restoration contractor if the water has reached finished walls or flooring.
Frequently asked questions
How many water leak sensors do I need?
Six covers most houses: water heater pan, behind the washer, sump pit above the high-water line, under the kitchen sink, behind the refrigerator, and the air handler drain pan. Add one for each additional appliance or fixture you have from the second tier (dishwasher, toilets, vanities, main shutoff, softener, boiler, floor drain, crawl space low point). A typical house ends up with six to ten. Three-sensor starter kits with a hub are the cheapest way to cover the first three.
Where exactly should a leak sensor go at the water heater?
In the drain pan, contacts on the pan floor, on the side away from the burner access. If there is no pan, on the floor at the base of the tank on the downhill side. A probe-cable sensor is ideal: the body sits on top of the tank where you can reach the battery, the probe lies in the pan. Pour a cup of water in the pan to confirm the pan drain actually goes somewhere, and add a second sensor under the T&P discharge pipe if it ends over the floor.
Where do I put a leak sensor in a sump pit?
On the pit wall or hung from the lid on a cord, with the contacts 1 to 2 in. above the level where the primary pump normally turns on and below the lid. If you have a battery backup, set it between the primary's turn-on level and the backup's, so an alert means the primary has failed. Pits under slabs are Wi-Fi dead zones; use a long-range hub system such as YoLink for this one.
Should the sensor go under the appliance or next to it?
Wherever the first puddle forms, which is usually directly under the fitting that fails, on the downhill side if the floor slopes. Pour half a cup of water where the leak would start and put the contacts where it pools. A probe cable lets you reach under a washer, dishwasher or refrigerator while the sensor body stays where you can reach it.
Can a water leak sensor shut off the water?
Yes, with the right pairing. Moen's Smart Water Detector can trigger a Moen Flo on the main; YoLink's sensors trigger YoLink's valve controller, which bolts onto your existing ball valve and runs on batteries; Phyn and Resideo take their own sensors. Set automatic shutoff on the sensors guarding unattended, high-volume failures (water heater, washer, main) and leave it off where a mopped floor would shut the house down.
How often should I test leak sensors?
Yearly at minimum, with a wet paper towel on the contacts, confirming the alert reaches your phone; monthly is better for the sump and water heater sensors. Write the battery date on each sensor. Battery life runs from about two years (Moen) to five-plus (YoLink, Govee); replace on schedule rather than waiting for the low-battery warning, and re-check placement after any appliance is moved or replaced.
DryHomeLab is written and reviewed by the team behind HelpMeNow.com, a marketplace that connects homeowners with vetted local contractors for water-damage restoration, plumbing and waterproofing. Before HelpMeNow the same team ran a 24/7 water-damage restoration company in the Seattle area; the equipment on this site is what we specified, bought and ran on real water losses. We publish the rubric behind every score.
- Ran a 24/7 water-damage restoration company, Seattle area
- Operate HelpMeNow.com, a contractor marketplace
- Publishes its scoring rubric