
The four questions
Restoration crews decide this in the first ten minutes on a loss, and they decide it the same way every time.
1. What kind of water? The IICRC S500 standard sorts water into three categories. Category 1 is clean: a supply line, a water heater, a tub overflow. Category 2 is significantly contaminated: washer or dishwasher discharge, a toilet overflow with urine, a sump pit backing up. Category 3 is grossly contaminated: sewage, water that rose from outside, anything that has stood for days. Drywall is porous. Category 1 water can be dried out of it; Category 2 and 3 water cannot be cleaned out of it, so drywall those categories touched is removed regardless of how dry it gets.
2. How high did it wick? Gypsum pulls water upward through its paper and core, and the wet line inside the wall is usually 6 to 12 in above the stain you can see. A moisture meter finds the real line. If the wall is wet to more than about 2 ft, cutting and replacing a strip is cheaper and faster than drying it, because drying time climbs with height and the sheet is a standard 4 ft wide anyway.
3. What is behind it? An empty cavity dries. Fiberglass batts hold water like a sponge and sag; cellulose packs into a wet mat; both come out, and the drywall in front of them comes with them. A polyethylene vapor barrier, foil-faced insulation, vinyl wallpaper or several coats of oil or semi-gloss paint trap the water on one side and slow drying to a crawl. Closed-cell spray foam and rigid foam board shed water and can be dried in place.
4. How long has it been wet? The EPA's guidance is that materials dried within 24 to 48 hours usually will not grow mold. Restoration practice treats 72 hours as the point where a wet wall becomes a mold question as well as a drying question. Drywall that has been wet for days, or that is swollen, crumbling, sagging or stained through, is removed.
The decision at a glance
| Situation | Dry in place | Cut it out |
|---|---|---|
| Water category | Category 1 (clean) only | Any Category 2 or 3 water |
| Height of the wet line (by meter) | Under about 2 ft | Over about 2 ft, or wet from above (ceiling leak running down) |
| Behind the drywall | Empty cavity; rigid or spray foam | Wet fiberglass or cellulose; polyethylene vapor barrier; foil-faced batts |
| Surface | Flat or eggshell latex paint | Vinyl wallpaper, tile, multiple coats of oil or semi-gloss paint that will not let vapor out |
| Time wet | Found and dried within 48 hours | More than 72 hours; any visible growth; swollen, sagging or crumbling board |
| Ceilings | Damp, flat, no sag, dried within a day | Any sag or bulge, standing water above, wet insulation above |
One answer in the right-hand column decides it. Drying in place is only worth attempting when every row lands on the left.
Reading the wall before you decide
Set a dry standard first: read a wall of the same construction in a part of the house that did not get wet and write the number down. Then read the wet wall in a grid, every 2 ft along the wall at 6, 18 and 30 in up, with the meter on the same setting, and mark each reading on painter's tape. A pinless meter sweeps fast and finds the boundary; a pin meter confirms it. On a pin meter with a gypsum scale, dry drywall reads under about 1 percent; on the wood-moisture-equivalent scale that professional meters use, dry is in the green band and anything in the red is wet. On a pinless meter the numbers are relative, so the only reading that matters is the comparison with your dry standard. Our moisture meter roundup covers the scales and the meters.
The highest reading in the grid, not the visible stain, is the wet line. Add 12 to 24 in to it and you have the flood cut height if you cut. If the readings fall back to the dry standard below 2 ft and the other three questions say clean, empty and recent, you dry.
Drying drywall in place
- 1
Stop the water and kill the circuits in that wall
Fix the source before the drying starts or you are drying a wall that is still being wetted. Turn off the breakers for any outlets or switches in the wet wall; water inside a cavity reaches boxes before it reaches you. Pull the outlet covers and look; a wet box or a scorched wire is an electrician before anything else.
- 2
Take the baseboard off
Score the caulk line with a utility knife, work a pry bar behind the baseboard against a scrap block, and number each piece on the back as it comes off. Wet MDF baseboard swells and will not go back; wood usually will. Pull the tack strip if there is carpet; our wet carpet guide covers the floor. The gap at the bottom of the drywall is now exposed, and it is your first vent.
- 3
Open the cavity at the plate
Drill 1/2 to 3/4 in holes through the drywall about 2 in above the floor, one between each pair of studs (every 16 in), low enough that the baseboard will cover them later. If the drill meets resistance an inch in, stop; that is the sole plate or blocking. The holes let the air movers push dry air across the back of the board, which is where the water is. On a tiled or papered wall that cannot breathe, cut a 4 in strip along the bottom instead.
- 4
Close the room and start the dehumidifier first
Shut doors, tape plastic over the HVAC supply and return in that room, and start the dehumidifier with its hose to a drain before any fan runs. Fans evaporate water into the air; the dehumidifier has to be ready to take it out or you are moving the moisture to the next room. A consumer 50-pint unit handles one small room; a flooded basement wall or a whole floor wants a commercial LGR, and the drying planner sizes it from the room volume.
- 5
Set the air movers along the wall
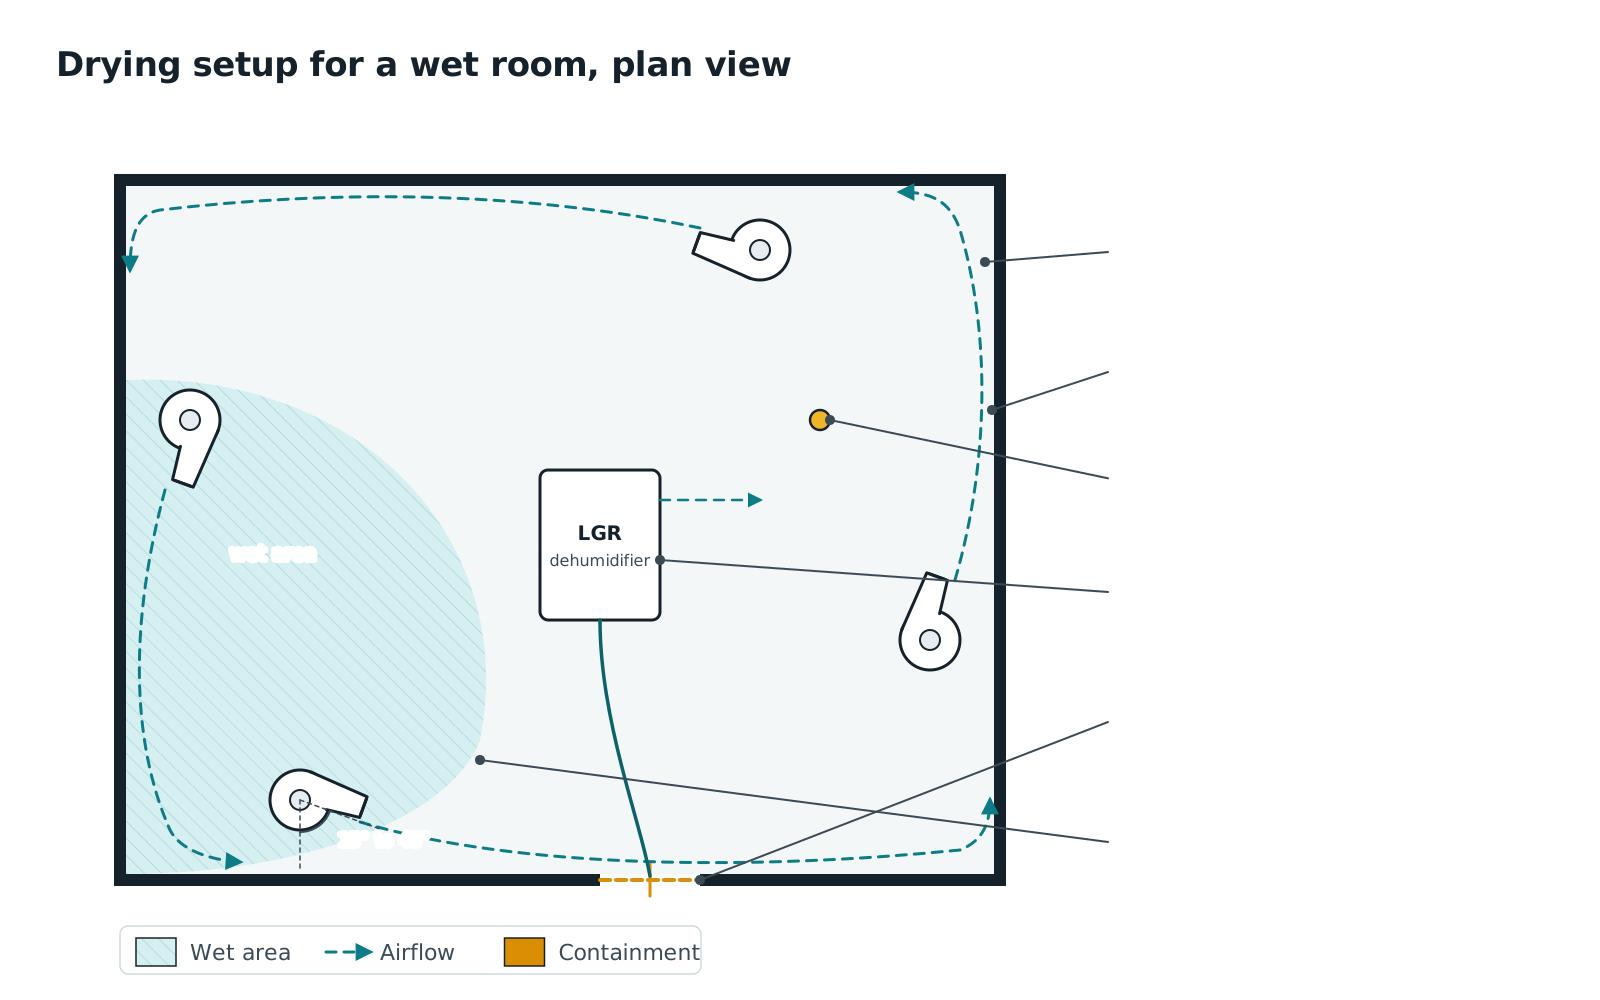
One air mover per 10 to 16 linear feet of wet wall, near the wall and angled 15 to 45 degrees to it so the airstream skims the surface and the vent holes, all pointing the same direction around the room. Do not aim a fan straight at the wall; it stalls the air and pushes moisture into the cavity. Low-profile units like the Velo Pro sit at the base of the wall and feed the holes; the drawing below shows the layout.
- 6
Read the grid every 24 hours
Same points, same meter, same setting, same time each day, and photograph the display against the tape. Readings should fall every day. A point that has not moved in 48 hours has something behind it the air is not reaching (insulation, blocking, a double layer of board) and that section gets cut. The wall is dry when every point matches the dry standard within a point or two and holds there the next day; clean-water walls with an empty cavity usually get there in three to five days.
- 7
Close it back up
Leave the dehumidifier running two more days while you patch the holes with setting compound, prime any staining with a stain-blocking primer, and caulk and reinstall the numbered baseboard. Keep the meter readings and photos; they are the record that the wall was dried if an adjuster, a buyer or a tenant asks.
The flood cut
- 1
Safety first, and test old finishes
Breakers off for the wall. Respirator, gloves and goggles on; drywall dust and anything growing behind it both belong outside your lungs. In a house built before 1978, paint may contain lead, and joint compound and textured finishes from before the mid-1980s may contain asbestos; test before cutting, and if either comes back positive the removal is a licensed abatement job. For Category 2 or 3 water, hang plastic over the doorway so the room is contained.
- 2
Mark the cut line
Take the highest wet reading from your grid and add 12 to 24 in. Then round to a height that makes the repair easy: 16, 24 or 48 in from the floor lands the new piece on a standard sheet dimension, and 24 in is the most common flood cut on a clean-water basement or supply-line loss. Snap a chalk line the full length of the wet wall; a straight cut is a straight tape joint later.
- 3
Cut shallow
Score along the line with a utility knife in several passes, or run an oscillating tool with the blade set to no more than the thickness of the drywall (1/2 in on most walls, 5/8 in on garage and fire-rated walls). Wires, pipes and the occasional gas line run an inch behind the board. Never plunge a circular saw into a wall. Snap the board along the score and cut the back paper.
- 4
Pull the board and bag it
Back out the screws or pry the nails, pull the lower section off in manageable pieces, and bag it. Photograph the open cavity before you touch anything inside it; it is evidence of what was wet and why. Remove the baseboard, and any tack strip or wet carpet pad, at the same time.
- 5
Remove wet insulation and the vapor barrier
Wet fiberglass batts come out to above the wet line, which is usually higher than the cut because the batt wicks; cut the batt square and bag it. Wet cellulose is scooped and vacuumed. Pull any polyethylene behind the board so the framing can breathe. The cavity is now open framing from the plate to the cut line.
- 6
Clean the framing
Wet-vacuum standing water out of the plate channel, wipe the studs and plate with clean water and a detergent, and vacuum again with a HEPA vacuum. For Category 2 or 3 water, apply an EPA-registered antimicrobial according to its label after cleaning; the label governs dwell time and surfaces. Bleach is not the answer on framing: it does not penetrate wood and its water content feeds what it does not reach.
- 7
Dry the framing to under 16 percent
Air movers along the open wall and the dehumidifier in the room, run continuously, with the pin meter in the sole plate and the bottom of each stud every 24 hours. Framing reads about 8 to 14 percent when dry and is wet above 16; wood above roughly 19 to 20 percent can support growth. Sole plates are the slow part because they sit on the slab; expect three to five days for the plate after the studs are done.
- 8
Rebuild when the numbers say so
New insulation, new drywall cut to the line, tape and mud, stain-blocking primer, paint, baseboard. If the wall is below grade and got wet from the outside, fix the outside first; the 72-hour basement guide ends with the prevention list.
Ceilings are different
A bulge or sag in a ceiling means water is pooled above it; relieve it before it comes down on its own. Put a bucket under the lowest point and push a screwdriver through to drain it, then widen the hole to see what is above. Any ceiling board that has sagged, even a little, is replaced; it does not flatten when it dries. Wet insulation above a ceiling comes out, usually from below through the opening, and the joist bay is dried with an air mover pointed into the hole. A ceiling that is merely damp, flat, and dried within a day can be dried in place with a fan on it and the dehumidifier below, but check the attic or the floor above for pooled water and wet insulation you cannot see from the room. Textured ceilings in older houses are the asbestos test case above.
The mold question
The EPA's guidance on mold and moisture in homes is that wet materials dried within 24 to 48 hours in most cases will not grow mold, that visible growth under about 10 square feet is something a homeowner can clean, and that larger areas, growth from contaminated water, or growth inside HVAC call for professional remediation. Three things make a wet wall worse: sealing the cavity while the framing is still wet, painting over a stain, and soaking drywall with bleach, which adds water to a porous material and does nothing behind it. If the wall smells musty when you open it, or there is growth on the back of the board, the cut moves up to clean material and the job becomes containment and removal rather than drying.
The gear that does this
Two tools make either path work: a moisture meter you can trust to call the wall dry, and air movers that sit low enough to feed the vent holes. For a single room, two compact air movers and a 50-pint dehumidifier with a hose are enough; for a flooded floor, rent an LGR and four or more air movers from the air mover roundup.
Dri-Eaz Velo Pro Low Profile Air Mover
The fan restoration crews buy by the pallet, with an amp dial that fits ten on one circuit.
Score breakdown
| Airflow | 885 | 0.4 |
| Amps per fan | 1.9 | 8.9 |
| Warranty | n/a | — |
| Positioning options | 5 | 10.0 |
| Daisy-chain outlets | true | 10.0 |
| Portability | 18.6 | 6.6 |
| Durability | plastic | 5.0 |
| Stackable | true | 10.0 |
| Quietness | 69 | 4.4 |
- Adjustable 1.2–1.9 A draw lets you balance several fans on one 15 A circuit
- Five operating positions cover floors, walls, stairs and cabinets
- Daisy-chain dual outlet; Dri-Eaz says up to ten units per 15 A circuit
- 18.6 lb with a built-in handle, and they stack six high on a hand truck
- 69 dB average is quiet for a professional air mover
- 885 CFM maximum is far less than a centrifugal unit; it needs company on big carpet
- Priced for contractors, roughly three times a hardware-store utility fan
- Dri-Eaz does not publish the warranty term on the product page; check the warranty document before buying
The Velo Pro is a low-profile axial air mover built for structural drying rather than for blowing air across a room. Dri-Eaz rates it at 500 to 885 CFM on a variable-speed dial, and the dial also sets the current draw anywhere from 1.2 to 1.9 A in 0.1 A steps. That second number is why crews like it: on a 15 A household circuit you can run eight to ten of these through their daisy-chain outlets without tripping a breaker, where a full-size centrifugal fan limits you to three.
The five operating positions matter more than the airflow figure. Laid flat it sweeps a wide, low path across carpet and subfloor. Tilted on its kickstand it hits the lower 2 ft of a wall where water wicks into drywall. Stood on end it dries a stairway or the inside of a cabinet. An hour meter tracks runtime, which is useful when you are logging a job for an insurance claim.
Where it falls short: it is not cheap for a homeowner who will use it once, and 885 CFM is a third of what a snail-shell centrifugal moves, so a single Velo Pro on a soaked 20 x 20 ft carpet is slow. It wants to be one of several fans working with a dehumidifier. At 69 dB it is quieter than most centrifugals but still not something you sleep next to.
Buy it if you own rental property, manage a building, or have had water in the same basement twice. For a one-time loss, rent this exact model from an equipment yard instead; it is what they stock.
General Tools MMD4E Digital Pin Moisture Meter
The cheap pin meter that is accurate enough to tell you whether to open a wall.
Score breakdown
| Accuracy | 2 | 7.5 |
| Versatility | pin | 7.0 |
| Professional grade | false | 0.0 |
| Warranty | 1 | 0.0 |
| Calibration check | true | 10.0 |
| Scan depth | n/a | — |
| Reading hold | true | 10.0 |
| Backlight | true | 10.0 |
| Temperature / RH | false | 0.0 |
- Manufacturer-rated ±2% accuracy, unusual at this price
- Calibration check holes in the pin cap (18.3% reference)
- Backlight, hold, audible alarm and auto power-off
- Two scales: wood 5–50% and building materials 1.5–33%
- Pin holes in every surface you test
- No species or temperature correction
- One-year warranty
- Reads only the surface unless the pins penetrate
The MMD4E is the pin meter most homeowners end up with, and for once the popular choice is a sound one. General Tools rates it at ±2% across a 5 to 50% range for wood and 1.5 to 33% for building materials, with a backlit LCD, a hold button, an audible alarm that trips at 16% in wood and 20% in building materials, and auto power-off after three minutes. It runs on a 9 V battery and the pins are replaceable.
The feature that earns it a place on a professional's list is the calibration check built into the pin cap: press the pins into the two holes and the meter should read 18.3% ±1% in wood mode. That is a real check against a fixed resistor, not a self-test light, and it is why we trust this meter more than pinless meters at the same price that cannot be verified at all.
What it will not do: it reads only where the pins touch, so you leave two small holes per reading and you only learn about the surface layer unless you drive the pins through paint into the paper and gypsum. It has no species or temperature correction, so treat wood readings as approximate and always compare with a dry reference area in the same house. The one-year warranty is short.
Buy it if you want to know, today, whether the drywall behind the washing machine is wet. Pair it with a pinless meter if you need to scan a whole room without leaving marks.
We don't copy Amazon reviews. Read customer reviews on Amazon (paid link).
When to call a pro
Call a restoration contractor if the water was Category 2 or 3, if the wall has been wet more than 72 hours, if more than one room or any ceiling is involved, if there is insulation in the wet section of an exterior wall, or if you open the wall and find growth or a musty smell. Call an abatement contractor before cutting if a pre-1980s house tests positive for lead paint or asbestos in the joint compound or texture. Call an electrician if any box in the wall is wet. If this is an insurance claim, photograph everything before you cut and keep every reading; our claim documentation checklist lists what the adjuster will ask for. The form below reaches vetted local restoration contractors through HelpMeNow.com, and the first 48 hours are the ones that matter.
Frequently asked questions
Does wet drywall always need to be replaced?
No. Drywall wet by clean water, to less than about 2 ft, with an empty cavity behind it and dried within a day or two, dries in place with the baseboard off, vent holes at the plate, air movers and a dehumidifier. It is replaced when the water was contaminated (Category 2 or 3 under IICRC S500), when it wicked higher than about 2 ft, when there is wet insulation or a vapor barrier behind it, when it has been wet more than about 72 hours, or when it is swollen, sagging or crumbling.
How long can drywall stay wet before mold grows?
The EPA's guidance is that materials dried within 24 to 48 hours in most cases will not grow mold. Restoration practice treats 72 hours as the point where a wet wall is a mold problem as well as a drying problem. That clock starts when the material got wet, not when you found it, which is why a leak that ran for a week behind a wall is a removal job even if the drywall looks fine.
How high should a flood cut be?
Twelve to 24 in above the highest wet reading on a moisture meter, which is usually 6 to 12 in above the stain you can see. Then round to a standard sheet dimension so the patch is easy: 16, 24 or 48 in from the floor. Twenty-four inches is the most common cut on a clean-water basement or supply-line loss. Cut higher if the insulation behind the wall is wet above that line, because the batt wicks higher than the board.
Can wet drywall dry on its own?
The face does. The back of the board, the paper against the studs and the sole plate behind it do not, because there is no air moving in a closed cavity. A wall that dries on its own from the front in a week has been wet in the cavity for that whole week. Open the bottom of the cavity, move air across it and dehumidify the room, and the same wall is dry in three to five days with a meter to prove it.
What moisture reading is acceptable for drywall?
The reading that matches a known-dry wall of the same construction in your house, taken with the same meter on the same setting; that dry standard beats any published number. As a rule of thumb, dry drywall reads under about 1 percent on a pin meter's gypsum scale and in the green band on the wood-moisture-equivalent scale pro meters use. Pinless readings are relative and only mean something against your dry standard. Framing behind the wall is dry under 16 percent.
Should insulation be removed if it got wet?
Fiberglass batts and cellulose, yes. Both hold water against the framing, sag or mat, and cannot be dried inside a wall. Cut the batt square above the wet line, bag it, and replace it once the framing reads under 16 percent. Closed-cell spray foam and rigid foam board do not absorb water and can usually stay; dry the framing around them and confirm with the meter.
The seasonal checklist, by email
One email when the season changes — freeze week, spring thaw, hurricane season — with the checklist for that month. No weekly newsletter, no selling your address.
We send one confirmation link first. Every email has a one-click unsubscribe. Privacy.
Check your inbox for the confirmation link; the checklist follows as soon as you click it.
You are on the list. The next email arrives when the season changes.
That did not go through. Check the address and try again.
DryHomeLab is written and reviewed by the team behind HelpMeNow.com, a marketplace that connects homeowners with vetted local contractors for water-damage restoration, plumbing and waterproofing. Before HelpMeNow the same team ran a 24/7 water-damage restoration company in the Seattle area; the equipment on this site is what we specified, bought and ran on real water losses. We publish the rubric behind every score.
- Ran a 24/7 water-damage restoration company, Seattle area
- Operate HelpMeNow.com, a contractor marketplace
- Publishes its scoring rubric