
The order of calls
- Stop the water and make the area safe. Main shutoff or the fixture valve (how to find and close it), breakers off for anything wet. Nothing about a claim is worth standing in water near an outlet.
- Call the insurer the same day. Claims lines run around the clock. Have the policy number, the address and a one-sentence description: what failed, when you found it, what is wet. Write down the claim number and the adjuster's name. Ask four questions: whether emergency mitigation (water extraction and drying) is authorized before the adjuster visits, whether they need to see anything before it is removed, what your deductible is, and how they want documentation sent. Most insurers expect you to start drying immediately and to keep what you remove available; confirm it and note who said so.
- Call a restoration contractor if more than one room is wet, if a ceiling or finished walls are involved, or if the water was anything other than clean. Ask whether they document to the IICRC S500 standard: moisture maps, daily drying logs, photos and equipment records. That paperwork is what the adjuster reads.
- Call the plumber to fix the source, and tell them to leave the failed part with you.
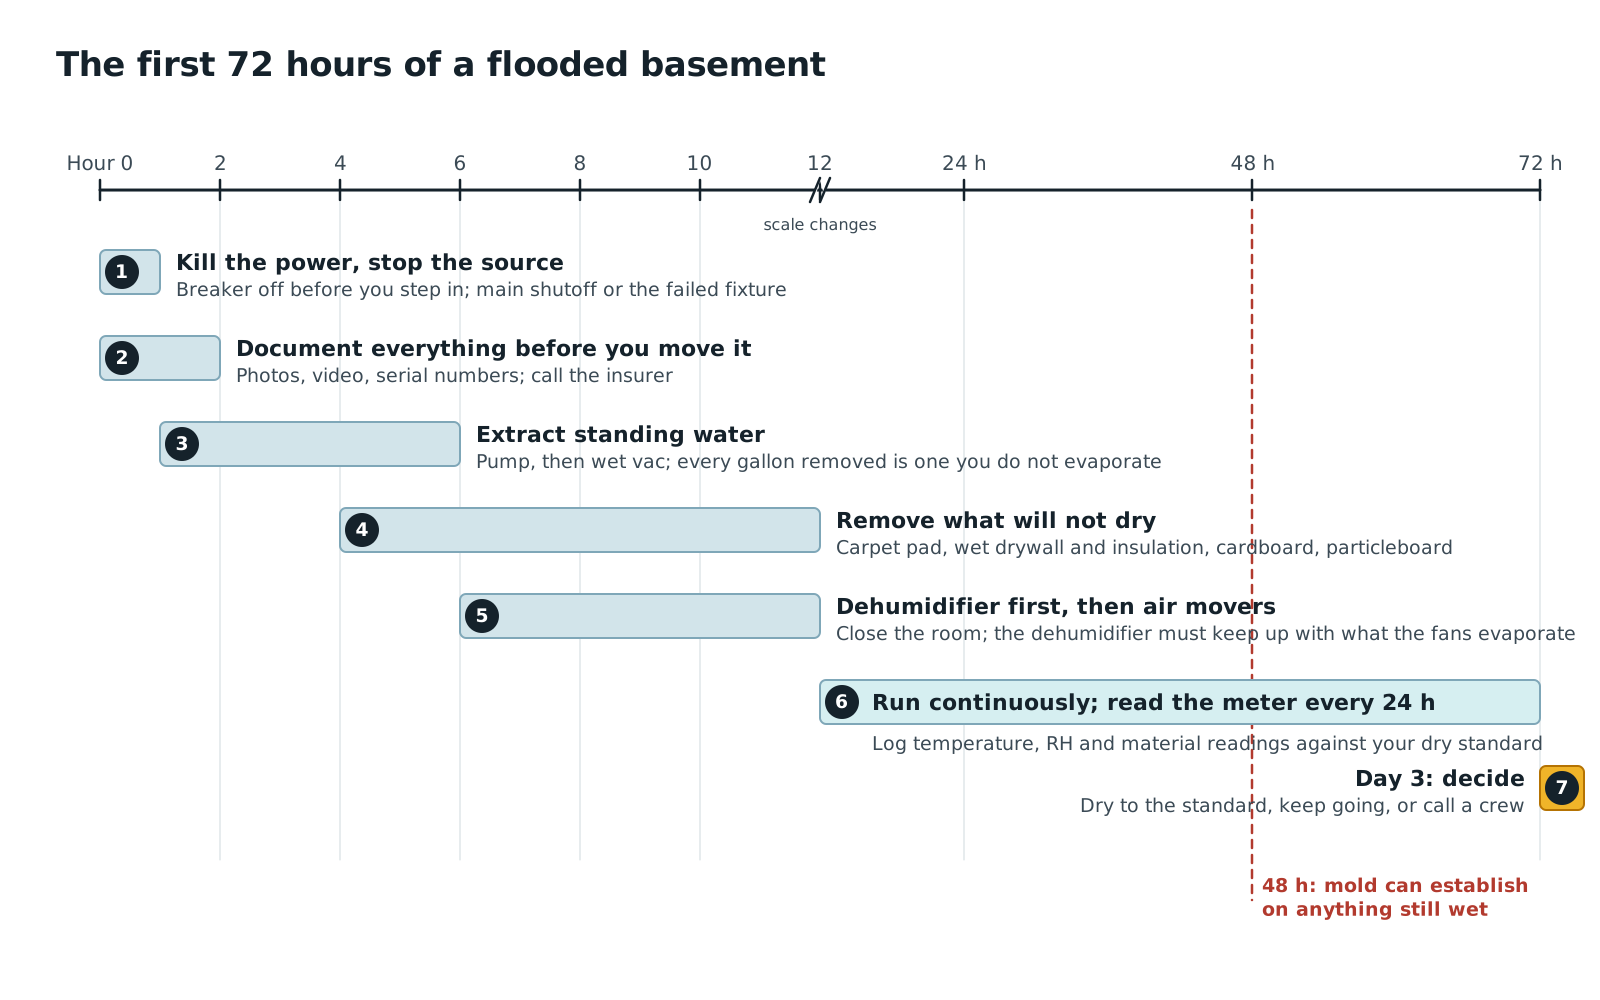
Documentation comes before cleanup; cleanup does not wait for the adjuster. The first two hours in the drawing below are where this checklist lives, and the drying that follows is itself part of the record.
Documenting the loss, in order
- 1
Photograph and film before anything moves
Start wide: every affected room from each corner, including the ceiling and the floor in the frame. Then medium shots of each wall, each piece of furniture and each appliance where it stands. Then close-ups: the water line on walls and furniture legs with a tape measure held against it, buckled flooring, stained ceilings, wet boxes, the underside of anything you lift. Film a slow walkthrough and narrate the date, the time and what you are looking at. Shoot more than feels reasonable; the photo you did not take is the one the adjuster asks for. Back everything up to the cloud before the phone goes near more water.
- 2
Capture the source, then keep it
Photograph the failed part in place before anyone touches it: the burst hose still on the washer, the split pipe, the water heater seam, the toilet supply line, the failed valve. Photograph the rating plate and serial number of any appliance involved, which also gives its manufacture date. When the plumber replaces the part, keep the old one in a labeled bag; adjusters ask to see it, and so do the manufacturer and the subrogation department if the insurer goes after the maker. Do not let the failed part leave with the plumber.
- 3
Write the timeline while it is fresh
When the area was last seen dry, when the water was discovered and by whom, when the water was shut off, when you called the insurer and got the claim number, when the plumber and the restoration contractor arrived. Times, not just dates. Stick to what you observed. If you do not know when the leak started, write that you do not know; a guess written down becomes a fact in the file.
- 4
Start a moisture log on day one
Mark reading points on painter's tape: every 2 ft along each wet wall at 6, 18 and 30 in up, the subfloor at the wettest corner, and one known-dry spot in another room as the dry standard. Read them with the same meter on the same setting at the same time each day, photograph the display next to the tape, and write the numbers in the table format below. The log proves two things an adjuster cares about: how far the water went, and that the structure was actually dried rather than closed up wet. If a restoration contractor is on the job they keep this log; ask for a copy. The 72-hour basement guide covers the drying the log describes.
- 5
Inventory the contents room by room
For every damaged item: what it is, brand and model, serial number if it has one, approximate age, what it cost or would cost to replace, its condition, and a photo of it and of the damage. Receipts, credit card statements and old photos of the room help establish ownership and value; email receipts are searchable. Group small items (a shelf of books, a box of holiday decorations) with one photo and a count. Do not throw anything away until the adjuster has released it or told you in writing that photos are enough; if something is a health hazard and must go, photograph it from several angles and keep a cut sample of carpet, pad or drywall in a bag.
- 6
Keep every receipt and log every hour of mitigation
Policies generally require you to protect the property from further damage, and most will consider reasonable costs of doing so as part of the claim; the receipts are how that is paid. Fan and dehumidifier rentals or purchases, the plumber, the restoration contractor, bags, plastic, a wet-dry vacuum, a hotel if you had to leave. Note the date, what you did and how long it took each day, including your own labor, and ask the adjuster whether that time is reimbursable under your policy rather than assuming.
- 7
Measure the scope
Square footage of wet floor in each room, linear feet of wet wall, the height water reached, the flooring type, the wall finish, and the ceiling if it is involved. Sketch each room with the measurements on it. Adjusters build their estimate from exactly these dimensions, and a homeowner's sketch that matches their tape keeps the conversation short.
- 8
Put it in one place
One folder: the timeline on page one, then photos numbered and dated, the moisture log, the inventory, the receipts, the contractor's reports and every email. Keep the originals; send copies. After every phone call with the adjuster, send a short email summarizing what was said and agreed. It is polite, and it is a record.
Moisture log template
| Date and time | Location | Material | Meter and scale | Reading | Dry standard | Photo no. |
|---|---|---|---|---|---|---|
| Mar 3, 7:30 am | Basement north wall, 4 ft from corner, 6 in up | Drywall | Pin, gypsum scale | 18% | 0.5% | 41 |
| Mar 3, 7:30 am | Basement north wall, 4 ft from corner, 18 in up | Drywall | Pin, gypsum scale | 4% | 0.5% | 42 |
| Mar 3, 7:35 am | Subfloor, NE corner | Plywood | Pin, wood scale | 27% | 11% | 43 |
| Mar 3, 7:40 am | Hallway (unaffected), 6 in up | Drywall | Pin, gypsum scale | 0.5% | dry standard | 44 |
One row per point per day, same meter, same scale. Readings that fall every day and end at the dry standard are the proof that the drying worked.
The words that matter: sudden versus gradual
Standard homeowners policies generally cover water damage that is sudden and accidental, a burst pipe, a failed supply hose, a water heater that lets go, and generally exclude damage from continuous or repeated seepage over weeks or months, from lack of maintenance, and from wear and tear. Three more distinctions come up on almost every water claim. Flood, meaning surface water or rising water from outside, is excluded from standard policies and covered, if at all, by a separate flood policy. Sewer and drain backup, including a sump pump that fails and lets ground water in, is typically excluded unless the policy carries a backup endorsement. Mold is often subject to a separate, lower limit. And in most policies the item that failed is not covered while the damage it caused is: the insurer pays for the floor the water heater ruined, not the water heater.
None of that is advice about your policy. It is the reason the timeline and the source matter so much. Describe what you observed, when, and what the failed part was, in plain terms, and let the adjuster and the contractor's readings establish the rest. Do not speculate about how long something had been leaking, and do not minimize it either. If you genuinely do not know, that is the accurate answer. If the adjuster's determination seems wrong, ask for it in writing with the policy language it relies on; that is the starting point for a conversation with your agent, a licensed public adjuster, or your state insurance department.
What the adjuster will ask
When you found it and when it was last dry. What caused it and whether it has been repaired. Who shut the water off and when. Whether the house was occupied. Whether you have had prior water claims or repairs in the area. What you have done since: extraction, drying equipment, what was removed. Who is doing the work and whether they have an estimate. Square footage affected and the materials involved. Whether the contents list is ready. Everything on the checklist answers one of those.
Working with the adjuster and the contractor
The adjuster writes a scope, a line-item description of what will be repaired and replaced, and an estimate from it. Ask for a copy. A restoration contractor working to IICRC S500 gives you moisture maps, daily drying logs, equipment lists and photos; ask for those too and make sure they reach the adjuster. If more damage is found once walls are opened, the contractor submits a supplement, which is normal. Read anything you are asked to sign: an authorization to begin emergency work is routine, while an assignment of benefits or direction-to-pay form transfers your claim rights or payments to the contractor and deserves a careful read first. You can usually choose your own contractor; ask the insurer how its preferred-vendor program affects that choice before you decide. Keep the house accessible for the inspection, walk the adjuster through your folder, and follow up in writing. Once the claim is closed, ask whether a leak detection device earns a premium discount; our insurer discount database lists the programs.
The checklist
| Stage | What to capture |
|---|---|
| Before anything moves | Wide, medium and close photos of every room; water line with a tape measure; video walkthrough with date and time; the source in place; appliance rating plates and serials; claim number and adjuster name |
| First day | Written timeline with times; failed part bagged and labeled; moisture reading points marked and the first readings logged with photos; emergency mitigation authorization noted |
| During drying | Daily moisture log; photos of every item removed before it leaves; cut samples of carpet, pad and drywall; receipts for rentals, purchases, plumber and contractor; a daily note of hours and work done |
| Contents | Room-by-room inventory with brand, model, serial, age, value, condition and photo; receipts or statements where you have them; nothing discarded without a release |
| Before the adjuster visit | Room sketches with measurements; the folder in order; the contractor's moisture maps, drying logs and estimate; questions written down |
| After every call | A short email to the adjuster summarizing what was discussed; copies of everything sent, originals kept |
Print it and tape it to the refrigerator for the week. Every row is something an adjuster has asked us for on a job.
The meter for a claim
Any meter that gives a repeatable number works for the log, provided you use the same one on the same scale every day and photograph the display. The pin meter below is the inexpensive one we hand homeowners; it has a built-in calibration check, which matters when the readings are evidence. If the claim is large or the house is one you expect to document again, the Protimeter SurveyMaster is the dual-mode meter adjusters and inspectors use themselves. Our moisture meter roundup covers the rest.
General Tools MMD4E Digital Pin Moisture Meter
The cheap pin meter that is accurate enough to tell you whether to open a wall.
Score breakdown
| Accuracy | 2 | 7.5 |
| Versatility | pin | 7.0 |
| Professional grade | false | 0.0 |
| Warranty | 1 | 0.0 |
| Calibration check | true | 10.0 |
| Scan depth | n/a | — |
| Reading hold | true | 10.0 |
| Backlight | true | 10.0 |
| Temperature / RH | false | 0.0 |
- Manufacturer-rated ±2% accuracy, unusual at this price
- Calibration check holes in the pin cap (18.3% reference)
- Backlight, hold, audible alarm and auto power-off
- Two scales: wood 5–50% and building materials 1.5–33%
- Pin holes in every surface you test
- No species or temperature correction
- One-year warranty
- Reads only the surface unless the pins penetrate
The MMD4E is the pin meter most homeowners end up with, and for once the popular choice is a sound one. General Tools rates it at ±2% across a 5 to 50% range for wood and 1.5 to 33% for building materials, with a backlit LCD, a hold button, an audible alarm that trips at 16% in wood and 20% in building materials, and auto power-off after three minutes. It runs on a 9 V battery and the pins are replaceable.
The feature that earns it a place on a professional's list is the calibration check built into the pin cap: press the pins into the two holes and the meter should read 18.3% ±1% in wood mode. That is a real check against a fixed resistor, not a self-test light, and it is why we trust this meter more than pinless meters at the same price that cannot be verified at all.
What it will not do: it reads only where the pins touch, so you leave two small holes per reading and you only learn about the surface layer unless you drive the pins through paint into the paper and gypsum. It has no species or temperature correction, so treat wood readings as approximate and always compare with a dry reference area in the same house. The one-year warranty is short.
Buy it if you want to know, today, whether the drywall behind the washing machine is wet. Pair it with a pinless meter if you need to scan a whole room without leaving marks.
We don't copy Amazon reviews. Read customer reviews on Amazon (paid link).
Protimeter SurveyMaster BLD5365 Dual-Function Moisture Meter
The meter insurers expect to see in the photos.
Score breakdown
| Accuracy | n/a | — |
| Versatility | dual | 10.0 |
| Professional grade | true | 10.0 |
| Warranty | 2 | 1.7 |
| Calibration check | true | 10.0 |
| Scan depth | 0.75 | 2.5 |
| Reading hold | n/a | — |
| Backlight | n/a | — |
| Temperature / RH | false | 0.0 |
- Pin and search modes in one meter; the industry's reference tool
- WME scale works across wood, drywall, plaster and masonry
- Calibration check device included
- Accepts deep-wall and hammer probe accessories; two-year warranty
- Priced for professionals
- No numeric accuracy specification in the brochure
- No temperature or humidity measurement
- Search mode is relative and reads metal behind the surface
The SurveyMaster is the dual-function meter that restoration crews, home inspectors and insurance adjusters have standardized on, and if you only ever buy one professional meter this is the one. Protimeter's brochure lists built-in pins reading 6 to 98% wood moisture equivalent (WME), and a non-invasive search mode that reads up to 3/4 in (19 mm) below the surface on a 70 to 999 relative scale. A calibration check device is included so you can prove the meter before every job.
The WME scale is the key idea. Instead of separate wood, drywall and masonry scales, the pins report the moisture content a piece of wood would have if it were in equilibrium with the material you are touching, which makes one color band work across the whole house: green is dry, yellow is borderline, red is wet. You find the wet area in search mode without marking anything, then switch to the pins to put a number on it. The pin head accepts Protimeter's deep-wall and hammer probes for subfloor and framing behind finished surfaces.
The costs: the brochure publishes no numeric accuracy figure, it measures neither temperature nor humidity, and it is priced in the several-hundred-dollar range, which is a lot for a one-time leak. The two-year warranty is the standard across Protimeter's line.
Buy it if you are documenting a claim, inspecting houses, or own property you expect to get wet again. For a single leak, rent one from an equipment yard or buy the Extech and a pin meter.
When to call a pro
Call a restoration contractor the same day if more than one room is wet, if a ceiling, finished walls or hardwood are involved, if the water was contaminated, or if the loss is going to be a claim at all; their S500 documentation carries more weight with an adjuster than a homeowner's notebook, and it comes with the drying. Call a licensed public adjuster if the claim is large and you want someone representing your side of the estimate; they are paid a percentage of the settlement, so read the contract. Call your state insurance department if communication stops or a denial does not cite the policy. The form below reaches vetted local restoration contractors through HelpMeNow.com who document to the standard.
Frequently asked questions
What should I document for a water damage insurance claim?
Photos and video of every affected room before anything is moved, including the water line with a tape measure; the source of the water in place and the failed part kept in a bag; a written timeline with times; dated moisture readings taken daily at marked points against a dry standard; a room-by-room inventory of damaged contents with brand, model, age, value and photos; receipts and a daily log for everything spent and done to mitigate; room measurements; and a summary email after every conversation with the adjuster.
Should I clean up before the adjuster comes?
Document first, then mitigate without waiting. Policies generally require you to protect the property from further damage, and drying cannot wait days for an inspection without turning a water loss into a mold loss. Photograph and film everything, call the insurer and confirm that emergency extraction and drying are authorized, then start. Keep what you remove, or photographs and samples of it, until the adjuster releases it.
Does homeowners insurance cover water damage from a leaking pipe?
Standard policies generally cover sudden and accidental discharge, such as a burst pipe or a failed supply hose, and generally exclude damage from continuous or repeated seepage over a long period, from lack of maintenance, and from flooding or sewer backup unless endorsed. The pipe or appliance that failed is usually not covered even when the damage it caused is. Policies differ; read the water damage sections of yours, and ask your agent or adjuster rather than relying on a general answer.
What is the difference between water damage and flood damage on a policy?
In insurance language, flood means surface water or rising water from outside the house: a river, storm surge, heavy rain pooling and entering at grade. Standard homeowners policies exclude it, and it is covered by a separate flood policy if you have one. Water damage from inside the house, a pipe, an appliance, a water heater, is what the homeowners policy addresses. Ground water entering through the foundation and sump pump failures sit in a third category that usually requires a backup or seepage endorsement.
How long do I have to report a water damage claim?
Policies require prompt notice, and the practical answer is the same day, because the duty to mitigate starts at discovery and a delay in reporting invites questions about how long the water was present. The formal deadlines for filing proof of loss and for suing on a denied claim vary by policy and state; they are printed in the policy's conditions section. Report immediately, document from the first hour, and ask the adjuster for every deadline in writing.
Can I throw away damaged items before the adjuster sees them?
Not until the adjuster has released them or told you in writing that photographs are sufficient. If something must go for health reasons, such as sewage-soaked carpet or wet insulation, photograph it from several angles, record its dimensions and location, and keep a cut sample in a bag. Keep the failed part that caused the loss no matter what; it is the single most important object in the claim.
The seasonal checklist, by email
One email when the season changes — freeze week, spring thaw, hurricane season — with the checklist for that month. No weekly newsletter, no selling your address.
We send one confirmation link first. Every email has a one-click unsubscribe. Privacy.
Check your inbox for the confirmation link; the checklist follows as soon as you click it.
You are on the list. The next email arrives when the season changes.
That did not go through. Check the address and try again.
DryHomeLab is written and reviewed by the team behind HelpMeNow.com, a marketplace that connects homeowners with vetted local contractors for water-damage restoration, plumbing and waterproofing. Before HelpMeNow the same team ran a 24/7 water-damage restoration company in the Seattle area; the equipment on this site is what we specified, bought and ran on real water losses. We publish the rubric behind every score.
- Ran a 24/7 water-damage restoration company, Seattle area
- Operate HelpMeNow.com, a contractor marketplace
- Publishes its scoring rubric