
Is the check valve the problem?
A sump check valve is a one-way gate on the discharge riser. When the pump stops, the valve closes and holds the column of water in the pipe so it does not fall back into the pit. When it fails, the pump re-pumps the same water on every cycle. Four symptoms point at it:
- Water rushes back into the pit after every cycle. Stand by the pit, let the pump run, and listen when it stops. A healthy valve gives a single soft click and silence. A failed one gives a two- to five-second gurgle as the riser drains.
- The pump short-cycles. It runs, stops, and starts again within a minute without any new water coming in, because the riser emptied back into the pit and lifted the float.
- A bang on every cycle. Water hammer: the column slams the flapper shut. That is usually a valve mounted too high or a valve without a spring, not a broken one, but the fix is the same part in the right place.
- The pump runs but the pit does not drop. A valve stuck closed, or a flapper that has come off its hinge and jammed in the pipe. Rare, and serious, because the pump is working against a wall; it overheats and trips its thermal overload.
If the pump cycles normally and the pit just never gets ahead, the valve is fine and the problem is inflow or an undersized pump; run the numbers in the sizing calculator. If the pump does not run at all, it is the switch, the power or the motor, not the valve; see how to test a sump pump.
Most sump check valves last 5 to 10 years. The flapper's rubber hardens, grit holds it off its seat, or the hinge pin wears. We replace the valve any time we replace a pump; a new pump behind an old valve is a new pump that short-cycles.
Choosing the replacement
Size. Measure the outside diameter of the riser. 1-1/2 in. PVC measures about 1.9 in. across; 1-1/4 in. PVC measures about 1.66 in. Most residential sump pumps, including every Zoeller and Wayne in our sump pump roundup, have a 1-1/2 in. discharge, and the riser matches. Buy the valve for the pipe you have, not the pump you wish you had.
Connection type. Three styles:
- Rubber-coupling (compression) valves come with two flexible couplings and four stainless clamps. No glue, serviceable in ten minutes, and the rubber absorbs vibration. This is what we install.
- Glue-in (slip) valves solvent-weld to the pipe. Quieter in theory, but the next replacement means cutting the pipe again. Use one only if you add a union above it.
- Threaded valves screw onto the pump's discharge adapter at the bottom of the pit. They put the valve underwater where you cannot see or service it; skip them unless the pit is too shallow for anything else.
Flapper vs spring. A plain swing-flapper valve relies on the falling water to close it, which is what produces the bang. A spring-loaded (quiet-close) valve closes the moment flow stops, before the column reverses, and is the answer to water hammer under a bedroom or a family room. It costs a little more and adds a small amount of head loss; on a 1/3 or 1/2 HP pump you will not notice.
Clear body. A clear-bodied valve lets you see the flapper work and spot a stuck one from across the room. Worth it.
Full port. The valve's bore should be the same size as the pipe. Cheap valves neck down inside and cost flow at every cycle.
A 1-1/2 in. quiet-close compression valve with a clear body is the one to buy. If the riser is 1-1/4 in., buy the 1-1/4 in. version rather than adapting; adapters add joints and head loss.
Tools and materials
- Replacement check valve with two rubber couplings and four stainless clamps (buy the kit; the loose couplings at the store may be the wrong wall thickness)
- PVC ratchet cutter or a fine-tooth hacksaw and a miter box
- Deburring tool or a utility knife; sandpaper
- 5/16 in. nut driver or a flat screwdriver for the clamps; a small torque screwdriver if you have one
- Tape measure, marker
- Bucket and towels; a wet-dry vacuum is handy
- Drill with a 3/16 in. bit if the riser has no weep hole
- Headlamp, nitrile gloves
If the existing valve is glued in with no union above it, add two 1-1/2 in. PVC couplings, a short piece of pipe, primer and cement to the list; you will be rebuilding a few inches of riser.
The replacement, step by step
- 1
Unplug the pump and pump the pit down first
Run the pump once by lifting the float (or wait for a cycle), then unplug it. Unplugging first and cutting second means the whole riser drains into the pit when you cut; pumping first means a smaller mess. If there is a battery backup, unplug its controller too so it does not start mid-job. Put a towel around the pit rim and the bucket under the valve.
- 2
Mark the flow direction and the cut lines
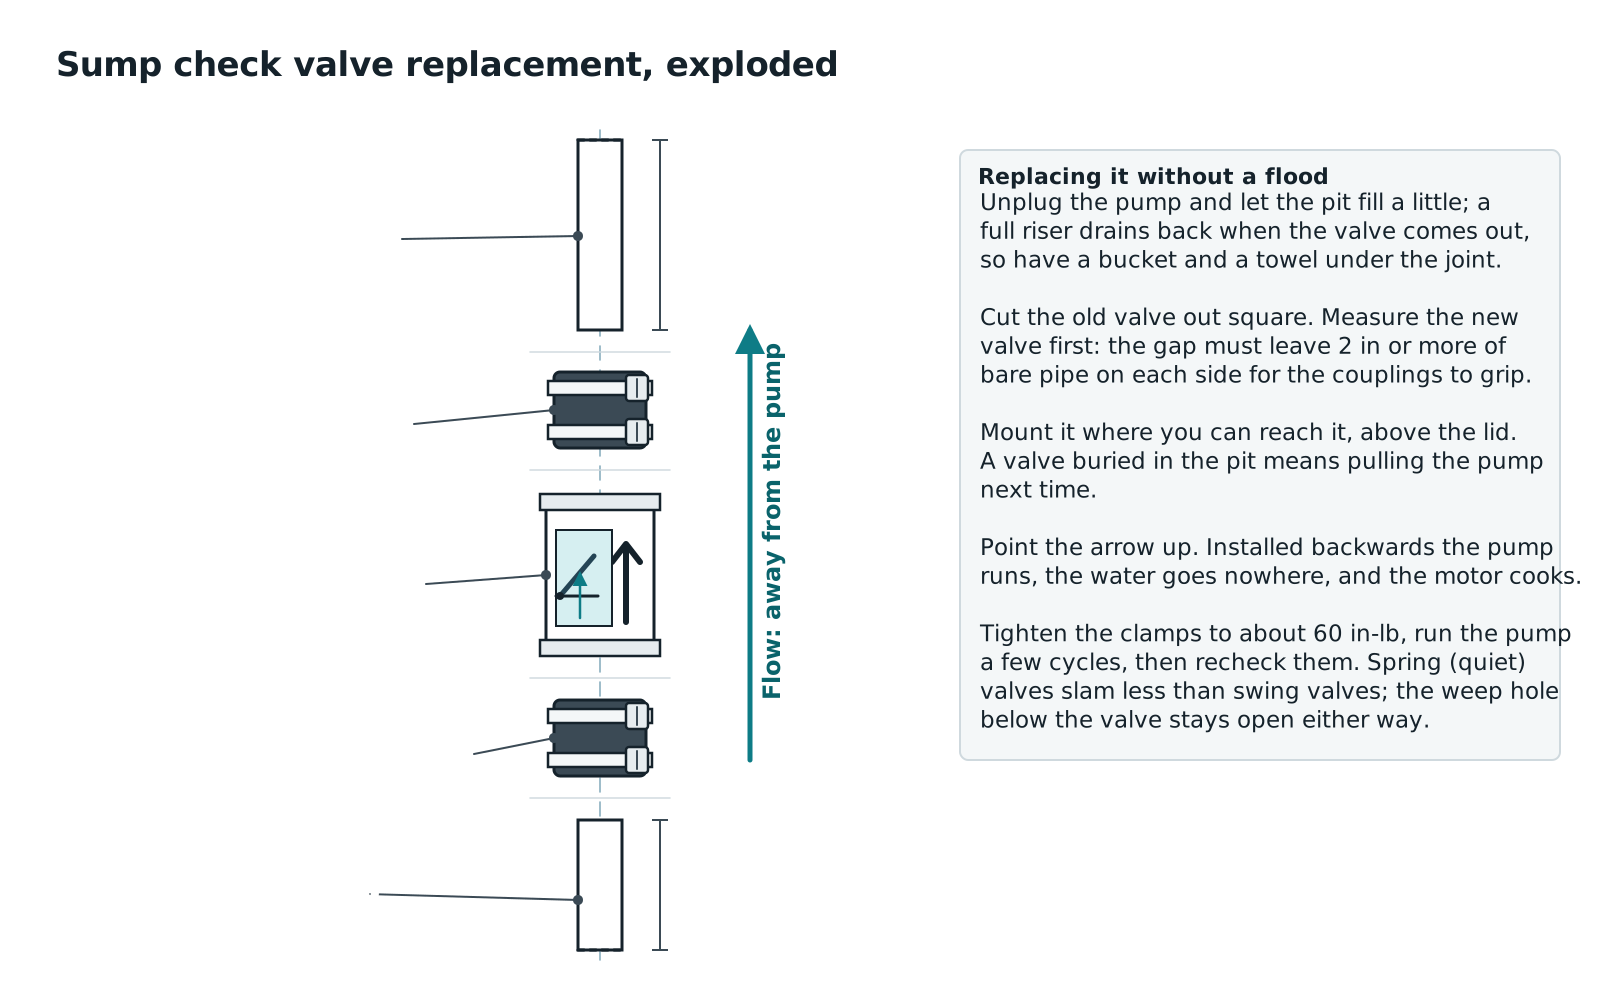
Before anything comes apart, draw an arrow on the riser pointing up, away from the pump. The new valve has an arrow molded on the body and it must point the same way. Then hold the new valve against the pipe where the old one sits and mark cut lines above and below it. You need the valve body length plus about 3/4 in. of bare pipe on each side for the couplings to grip. If the old valve is a compression type, your cuts are the old clamps; loosen them and skip the saw. If it is glued, you are cutting pipe.
- 3
Cut the riser square and let it drain
Cut the lower line first, keeping the saw or cutter square to the pipe; an angled cut will not seal in a rubber coupling. Expect a column of water to fall into the pit. Then cut the upper line and lift the old valve out. Deburr both pipe ends inside and out and sand off any ridges, paint or glue drips in the last inch; the coupling seals on smooth pipe.
- 4
Check the clearance and the weep hole
The valve should sit 12 to 18 in. above the pump's discharge, high enough to be above the lid and reachable, low enough that the column of water above it is short; a valve at the ceiling is the bang you have been hearing. While the riser is open, look for a weep hole: a 3/16 in. hole drilled in the riser 2 in. above the pump outlet, below the valve, angled down into the pit. It lets air out so the pump does not air-lock. If there is none, drill one now.
- 5
Fit the couplings and orient the arrow
Slide a coupling fully onto each pipe end with its clamps loose, then back one off, insert the valve with its arrow pointing up, away from the pump, and slide the couplings back so each one covers equal amounts of pipe and valve. Many valves have a stop ridge in the middle of the coupling; the pipe and the valve each seat against it. Rotate the valve so the clear window faces you and any service port is reachable. If the riser also has a union, keep the union above the valve.
- 6
Tighten the clamps on the pipe side first, then the valve side
Snug all four clamps, then tighten in two rounds: pipe-side clamps, then valve-side clamps, then back over all four. Firm with a nut driver is enough; the coupling instructions give a torque figure (commonly about 60 in-lb), and overtightening cuts the rubber. The valve should not rotate by hand when you are done. If the pipe side slips, the pipe end was not smooth or not fully inserted; take it apart and fix that rather than cranking the clamp.
- 7
Test for three full cycles
Plug the pump in and fill the pit with a hose until it cycles. Watch the clear window: the flapper should lift on the run and drop closed the instant the pump stops, with no water running back. Listen for a single click, not a bang and not a gurgle. Check both couplings for weeping with a dry paper towel. Run it two more times. Then plug the backup controller back in and reset its alarm if it sounded. Write the date on the valve body with a marker.
Three things that go wrong
Arrow the wrong way. The pump runs against a closed gate, the pit does not drop, and the thermal overload trips in a few minutes. If the pit does not fall on the first test cycle, unplug and look at the arrow before anything else.
Valve installed underwater on the pump adapter. Threaded valves that sit in the pit are fine until they are not; when they fail you are pulling the pump to find out. Keep the valve above the lid where you can see it.
Coupling on a painted or glue-smeared pipe end. The clamp feels tight and the joint weeps at every cycle, which you discover from the puddle a month later. Clean, smooth pipe under the rubber, every time.
When to replace the pump instead
If the valve was fine and the pump still short-cycles, the float or switch is failing; on a pump over about seven years old we replace the pump rather than the switch, and we replace the valve at the same time because they are the same afternoon. Our best sump pump picks are all cast iron with vertical floats and a 1-1/2 in. discharge, and the Zoeller M53 below is the one plumbers put in their own basements. If the pump cycles ten or more times an hour in dry weather with a good valve, you may have a discharge line that drains back from a long horizontal run, a pit that is collecting water from a leaking supply or a buried downspout, or a water table that needs a bigger pit; those are a waterproofer's questions.
Zoeller M53 Mighty-Mate
The pump plumbers install in their own basements.
Score breakdown
| Flow at 10 ft of head | 2040 | 0.9 |
| Build material | cast iron | 10.0 |
| Switch reliability | vertical float | 9.0 |
| Warranty | 3 | 5.0 |
| Head capability | 19.25 | 2.8 |
| Efficiency (lower amps) | 9.7 | 2.9 |
| Cord length | 9 | 0.6 |
| Solids handling | 0.5 | 10.0 |
| Thermal protection | true | 10.0 |
- Cast iron switch case, motor housing and base shed heat into the water
- Slow 1,550 RPM motor runs cool and quiet
- Vortex impeller passes 1/2-inch solids without clogging
- Auto-reset thermal overload protects a pump that runs dry
- 9-ft cord is short for deep pits; longer-cord versions cost more
- 9.7 A draw is high for the flow it delivers
- Flow falls off steeply above 15 ft of lift
- 3-year warranty trails Wayne's 5 years
The M53 is the pump we find most often when we open a pit on a water loss in an older home, and usually it is still running. It is a 3/10 HP, 1,550 RPM cast iron submersible with a non-clogging vortex impeller that passes 1/2-inch solids, an integral float switch, and an auto-reset thermal overload. Zoeller rates it at 43 GPM (2,580 GPH) at zero head and 2,040 GPH at 10 ft, with a 19.25-ft shutoff.
Where it shines is longevity, not peak numbers. Cast iron on the switch case, motor housing and base dumps motor heat into the water, and the slow 1,550 RPM shaded-pole motor runs cool and quiet. On a typical basement lift of 8–12 ft it moves plenty of water for a normal pit fed by 4-inch drain tile.
Where it falls short: the 9-ft cord is short for a deep pit, the 9.7 A draw is high for a 3/10 HP motor, and once your lift gets near 15 ft the curve drops hard. If your inflow test on our sizing calculator shows more than about 30 GPM at 10 ft, step up to the M98 or a 3/4 HP Wayne.
Buy it if you have a standard 18-inch pit, under 12 ft of lift, and want the pump most plumbers install in their own basements. The 3-year warranty is shorter than Wayne's five, but field survival is the better number.
We don't copy Amazon reviews. Read customer reviews on Amazon (paid link).
When to call a pro
Call a plumber if the riser is iron or galvanized pipe rather than PVC, if the valve is buried in a finished wall or ceiling, if the pit has a sealed radon lid you are not comfortable disturbing, if the discharge is glued with no union and no room to rebuild it, or if the pump is tripping the breaker. A plumber does a check valve in under an hour; the form below reaches vetted local plumbers through HelpMeNow.com. If water is coming into the basement right now because the pump cannot keep up, use the emergency page instead.
Frequently asked questions
Which way does a sump pump check valve go?
The arrow on the valve body points in the direction of flow: up and away from the pump, toward the discharge. Installed backward, the pump runs against a closed gate, the pit does not drop and the motor overheats within minutes. Mark the riser with an arrow before you take the old valve off, and check the new valve's arrow against it before you tighten a clamp.
How high above the pump should the check valve be?
Twelve to eighteen inches above the pump's discharge, which usually puts it just above the pit lid where you can see and service it. Mounted at the ceiling or on the horizontal run, the valve holds a tall column of water that slams it shut on every cycle; that is the bang most people are trying to cure. Keep a union above the valve so the next swap does not need a saw.
How do I know if my sump pump check valve is bad?
Listen when the pump stops. A good valve clicks once and the riser stays full. A failed valve lets you hear water rush back into the pit for several seconds, and the pump restarts within a minute without new water coming in. A bang on every cycle is water hammer from a flapper valve or a valve mounted too high, not necessarily a failure, but a quiet-close valve in the right spot fixes both.
Do I need a check valve on a sump pump at all?
Yes. Without one, every gallon in the riser falls back into the pit when the pump stops, so the pump re-pumps the same water on each cycle, runs two or three times as often, and wears out early. Codes in most jurisdictions require one. The only exception is a very short discharge that empties by gravity outside, and even then a valve stops sewer gas and cold air coming back down the pipe.
What size check valve does a sump pump use?
Match the riser pipe, not the pump. Most residential pumps have a 1-1/2 in. discharge and a 1-1/2 in. PVC riser, which measures about 1.9 in. across the outside. Some smaller pumps use 1-1/4 in. pipe, about 1.66 in. outside. Buy the valve for the pipe you measure; adapting between sizes adds joints and head loss.
Spring check valve or swing check valve for a sump pump?
Spring-loaded (quiet-close) for any pit under living space. It closes as flow stops, before the column reverses, so there is no hammer. A plain swing flapper is cheaper and has slightly less head loss, but the bang on every cycle is the complaint we hear most. Either way, buy a full-port, clear-bodied valve with rubber couplings so you can see it work and swap it without glue.
DryHomeLab is written and reviewed by the team behind HelpMeNow.com, a marketplace that connects homeowners with vetted local contractors for water-damage restoration, plumbing and waterproofing. Before HelpMeNow the same team ran a 24/7 water-damage restoration company in the Seattle area; the equipment on this site is what we specified, bought and ran on real water losses. We publish the rubric behind every score.
- Ran a 24/7 water-damage restoration company, Seattle area
- Operate HelpMeNow.com, a contractor marketplace
- Publishes its scoring rubric