
Should you do this yourself?
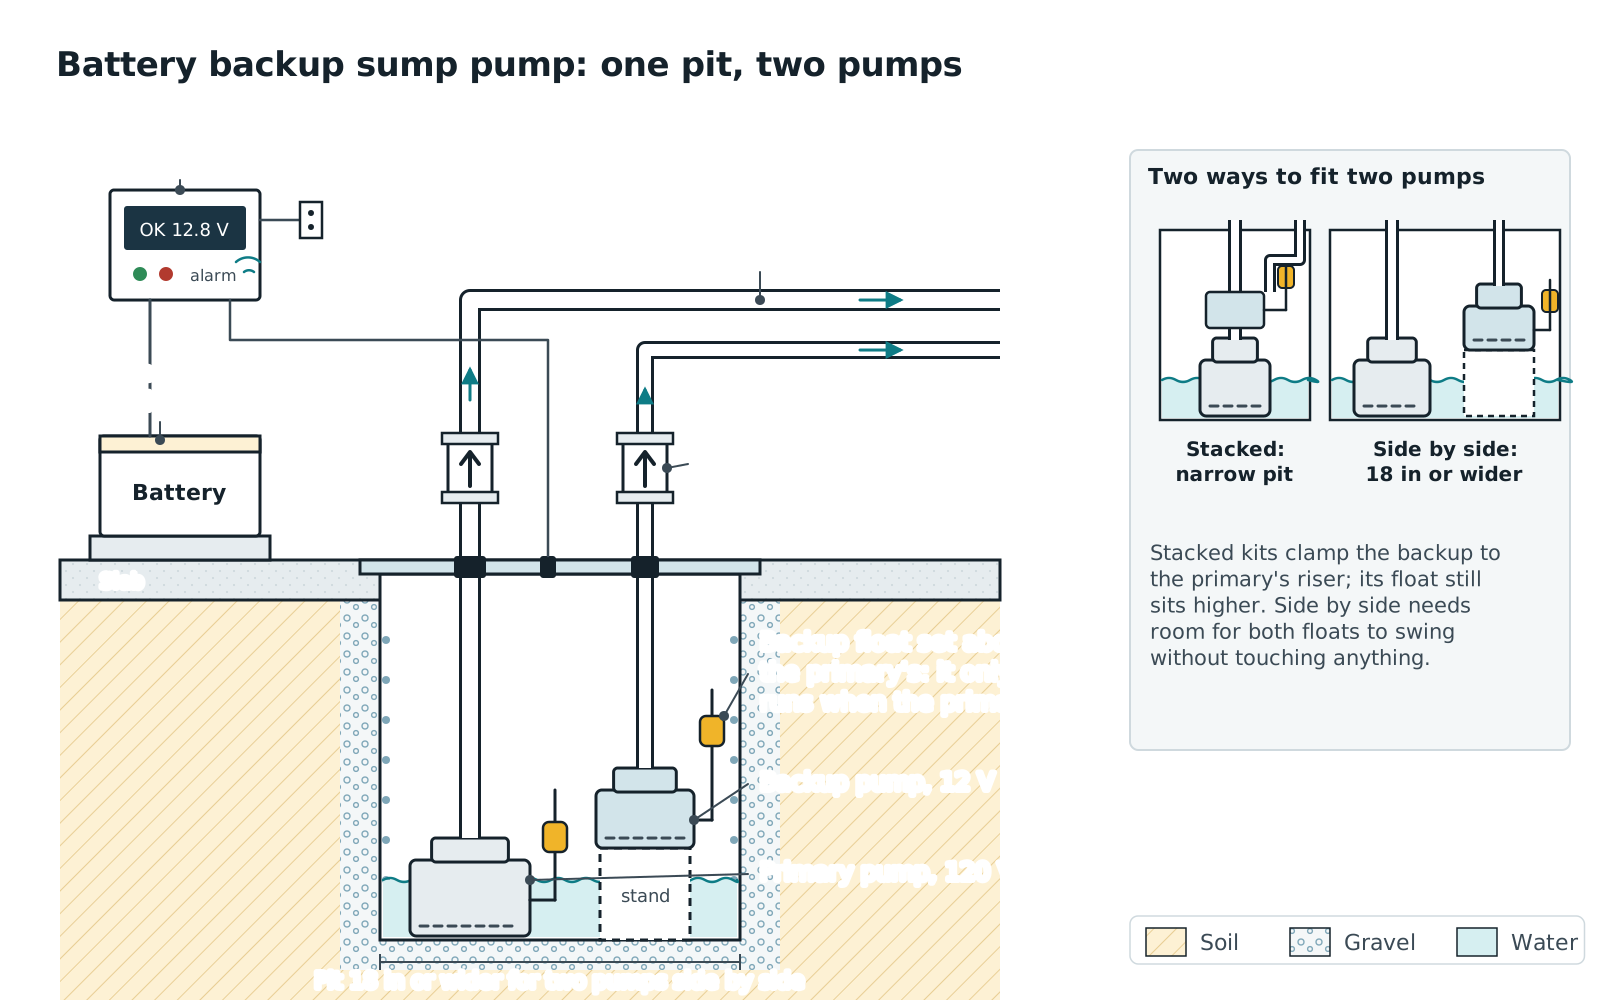
Yes, if all of these are true: the primary pump works and is less than about eight years old; the pit is at least 18 in. in diameter (16 in. for a pre-assembled combo) and deep enough that a second float can travel without touching anything; you have a grounded outlet within cord reach that is not shared with a freezer or dehumidifier; and you are comfortable cutting and solvent-welding 1-1/2 in. PVC. Plan on three to four hours the first time, most of it dry-fitting.
Call a plumber or waterproofer instead if the pit is 14 in. or smaller (there is no room for two pumps and two floats; a water-powered backup or a combo on a single stand is the answer), if the primary needs replacing too (do both at once with a combo system), if the discharge is buried and you cannot find where it goes, or if the panel and the pit are in the same water on a bad day. We put the quote form at the end for that.
One decision to make before you buy anything: battery, water-powered, or both. A battery backup works in any house and moves 1,850 to 2,400 GPH at 10 ft for the units we recommend, for 40 to 50 hours at a light duty cycle. A water-powered backup needs municipal pressure and moves less water, but never runs out. Finished basement, storms that bring outages: battery first, water-powered as a second layer. Our battery backup roundup and water-powered roundup cover the choice; this guide assumes you bought a battery system.
Tools and materials
Tools
- Tape measure, marker, level
- PVC cutter or fine-tooth hacksaw; deburring tool or utility knife
- Drill with a 3/16 in. bit (weep hole) and a 1/4 in. nut driver or flat screwdriver for hose clamps
- Channel-lock pliers, adjustable wrench
- Bucket, sponge and a wet-dry vacuum to empty the pit
- Flashlight or headlamp; nitrile gloves
Materials
- The backup system: DC pump, controller/charger, float switch and fittings. Most kits include the pump riser fittings; read the box.
- A deep-cycle battery in the size the manufacturer specifies: Group 27 for the Basement Watchdog units and Liberty's StormCell, Group 27/29/31 for the Zoeller Aquanot Fit. AGM (sealed) or flooded wet-cell; the manufacturer's own AGM is the simple choice.
- Battery box with lid (usually included) and a pad or shelf to set it on
- 1-1/2 in. Schedule 40 PVC pipe (two 5-ft lengths covers most pits), a 1-1/2 in. check valve for the backup riser, two 1-1/2 in. PVC unions, elbows and a tee or a second rim-joist fitting if you are running a separate discharge
- Flexible rubber couplings with stainless clamps (two) if the kit uses them instead of a glued check valve
- PVC primer and cement; Teflon tape for the pump's threaded adapter
- A paver or concrete block to raise the backup pump off the pit floor
- Zip ties or pipe clamps to secure the risers to each other and the lid
If the backup kit lists a stand or bracket, use it; the pump must sit above the primary's intake so it is not sucking the same silt.
The install, in order
- 1
Measure the pit and choose the layout
Unplug the primary. Measure the pit diameter at the top and at the bottom (liners taper), the depth from the lid to the floor, and the height of the primary's float at its turn-on point. Two pumps side by side need an 18 in. basin: Liberty specifies 18 by 18 in. for its combos, and the Basement Watchdog and Zoeller backups want the same. In a 16 in. pit, a pre-assembled stacked combo such as the Wayne WSS30Vn is the only clean fit. In anything smaller, stop here and look at a water-powered backup. Note which direction the primary's float swings or rises; the backup must sit where it cannot interfere. Sketch it. Then pump the pit down with the primary and vacuum the last few inches so you can see the floor.
- 2
Set the backup pump on a stand
Place a paver or the kit's stand on the pit floor so the backup's intake sits 3 to 4 in. higher than the primary's. That keeps it out of the silt the primary stirs up and means the primary always starts first. Position the backup so the two floats cannot touch each other, the risers or the pit wall at any point of travel. If the kit uses a bracket that clamps to the primary's riser, mount it now but leave the clamp loose until the risers are built.
- 3
Set the backup float 2 to 3 inches above the primary's turn-on level
This is the step that decides whether the backup is a backup. The DC pump should run only when the primary has failed or cannot keep up. Measure the primary's turn-on water level (the point where its float lifts the switch) and set the backup float so it triggers 2 to 3 in. higher. Too low and the backup runs on every cycle, drains its battery during an ordinary rain and is empty the night the power actually fails. Too high and the pit overflows before it starts. Tethered floats need the tether length set per the manual; vertical floats are set by the height of the bracket.
- 4
Build the backup riser with its own check valve
Thread the pump's discharge adapter into the backup (Teflon tape, hand tight plus a quarter turn), then dry-fit 1-1/2 in. PVC straight up. Install the backup's check valve 12 to 18 in. above the pump, arrow pointing up and away from the pump, with a union above it so it can be serviced. Never skip this valve: without it the primary's discharge flows backward through the idle backup pump into the pit, and the primary runs forever. Drill a 3/16 in. weep hole in the riser 2 in. above the pump outlet, below the check valve, angled down into the pit, so air cannot lock the pump. Dry-fit everything, mark the joints with a marker, then prime and cement.
- 5
Tie in above the primary's check valve, or run a separate discharge
The cleanest install is a second discharge pipe through the rim joist, and some local codes require it. If you tee into the primary's line instead, the tee goes above the primary's check valve, so each pump has its own valve between it and the shared pipe and neither can push water back through the other. Use a sanitary tee or a wye pointed in the direction of flow, not a straight tee facing the oncoming water. Keep the horizontal run short and sloped toward the outside. Support the risers so they cannot vibrate against each other; zip ties between the two pipes and a clamp at the lid are enough.
- 6
Place the battery box and wire the controller
Set the battery box on a shelf or a couple of blocks, above the level a pit overflow would reach, away from the furnace and water heater, and leave the lid on; flooded batteries vent hydrogen while charging. Mount the controller on the wall at eye level where you will see its lights. Connect the pump leads and the float to the controller per the manual, then the battery: positive first, negative last, terminals clean and tight. Plug the charger into an outlet that is not on the same circuit as a freezer, dehumidifier or anything that could trip it. Most controllers run a self-test when they power up; let it finish.
- 7
Test it the way the storm will
Plug the primary back in and fill the pit with a hose until the primary cycles. Confirm the backup did not run. Now unplug the primary and keep filling: the backup should start when the water reaches its float, pump the pit down, and the controller should alarm. Watch the backup check valve; water should not run back into the pit when it stops. Check every glued joint and the weep hole for spray. Plug the primary back in, silence the alarm, and confirm the charger goes back to charging. Write the install date on the battery with a paint marker. Then repeat the unplug test once a month; the roundup's installation gotchas cover the rest of the routine.
Which backup to buy for a DIY install
Any of the dedicated DC systems in our roundup installs the way described above. Three fit different situations:
- Basement Watchdog Big Dog CONNECT moves the most water of the dedicated backups (2,200 GPH at 10 ft) and has a 20 A charger that refills a drained battery in a few hours, which matters when storms arrive two days apart. It needs an 18 in. pit and a Group 27 battery, sold separately.
- Zoeller Aquanot Fit 508 ProPak with M53 is the one-box answer when the primary is also due: a pre-piped M53 primary and a Wi-Fi backup from the same company, 2,040 GPH at 10 ft, 48 hours at a 10 percent duty cycle, 3-year warranty. More to carry down the stairs, less to figure out.
- Wayne WSS30Vn is the pre-assembled stacked combo for a 16 in. pit with a short lift. It is the easiest install here, but Wayne publishes no runtime or charger figures and the backup moves only 1,500 GPH at 10 ft, so we treat it as the small-pit option rather than a first choice.
Size the primary, not the backup, with the sump pump sizing calculator; the backup only has to keep up with the pit on the worst night, and the roundup's runtime math tells you how long it will.
Basement Watchdog Big Dog CONNECT
The strongest charger and the most water of the dedicated backups.
Score breakdown
| Flow at 10 ft of head | 2200 | 6.0 |
| Runtime | 40 | 1.7 |
| Warranty | 2 | 2.5 |
| App alerts | false | 0.0 |
| Audible alarm | true | 10.0 |
| Charger strength | 20 | 10.0 |
| Battery included | false | 0.0 |
| Automatic self-test | true | 10.0 |
| Primary pump included | false | 0.0 |
- 2,200 GPH at 10 ft, the most of the dedicated backups we checked
- 20 A multistage charger recovers the battery between storms
- Weekly automatic self-test and battery-percent display
- Dual-float switch with dual reed switches
- Dry-contact terminal for a security system
- Battery sold separately
- Wi-Fi alerts require the BW-WiFi2 module, sold separately
- 2-year base warranty unless you buy the Watchdog battery and register
- Draws 20 A at 10 ft, so runtime depends on battery capacity
The Big Dog CONNECT is Basement Watchdog's heavy backup: a 12 V pump rated 3,500 GPH at zero head and 2,200 GPH at 10 ft, with a 16-ft maximum head and a 20 A draw at 10 ft. That is enough to keep up with most primary pumps' real-world duty, not just trickle water out while you wait for the utility.
The part most people overlook is the charger. The Big Dog ships with a 20 A multistage smart charger, more than ten times the 1.6 A unit in the Special. After a long outage a 20 A charger refills a Group 27 battery in hours rather than days, which matters when storms come in pairs. Watchdog rates runtime at 40 hours on one BW-27AGM battery at a 10% duty cycle, 80 hours with two, and the controller runs a weekly self-test, sounds an alarm you can silence for 24 hours, shows battery charge percentage, and flags a loose cable, a discharged battery, a failed pump, or a blown fuse. The switch is a dual-float with dual micro-reed switches.
Where it falls short: the battery is not included, Wi-Fi alerts need the BW-WiFi2 module sold separately, and the base warranty is 2 years (buying with a Watchdog AGM battery adds one year and registering within 60 days adds another, for 4). Pit size is not published; plan on an 18-inch basin if you are adding this beside a primary.
Buy it if your basement is finished and the primary pump cycles hard in spring. Add the Wi-Fi module.
Zoeller Aquanot Fit 508 ProPak with M53
A pre-piped M53 and a Wi-Fi backup, built by the same company.
Score breakdown
| Flow at 10 ft of head | 2040 | 5.2 |
| Runtime | 48 | 2.5 |
| Warranty | 3 | 5.0 |
| App alerts | true | 10.0 |
| Audible alarm | true | 10.0 |
| Charger strength | n/a | — |
| Battery included | false | 0.0 |
| Automatic self-test | true | 10.0 |
| Primary pump included | true | 10.0 |
- Backup rated 2,040 GPH at 10 ft, matching the M53 primary
- Built-in Wi-Fi alerts and remote test through Z-Control
- Pre-piped at the factory; one drop-in install
- Self-test on an adjustable schedule
- Available with M63 or M98 primaries
- Battery sold separately
- Charger amperage not published
- M53 primary limits the system in high-inflow pits
- Pit diameter not stated; plan on a full-size basin
The ProPak is Zoeller's pre-piped combination: an M53 primary and an Aquanot Fit 508 12 V backup, plumbed together at the factory so the pit work is a single drop-in. The 508 pump is rated at approximately 34 GPM, 2,040 GPH, at 10 ft of head at 12.7 V, which is the same 10-ft figure Zoeller publishes for the M53 itself. In other words, when the power fails you keep essentially the primary pump's capacity instead of a fraction of it.
Zoeller rates the 508 for up to 5.5 hours of continuous pumping on a fully charged battery and 48+ hours at a 10% duty cycle. The battery box takes Group 27, 29 or 31 deep-cycle batteries, including Zoeller's maintenance-free AGM, and batteries are sold separately. The Fit 508 controller has built-in Wi-Fi with Zoeller's Z-Control platform: it alerts on power loss and restoration, pump activation, pump fault, switch fault and connection fault, monitors high water, an air-locked pump, a stuck switch and charger faults, and runs a self-test on an adjustable schedule. The system carries a 3-year limited warranty.
Where it falls short: Zoeller does not state charger amperage on the product page, pit diameter is not published, and the M53's 2,040 GPH at 10 ft limits the whole system in a fast pit. Zoeller offers the same ProPak with the M63 (5-year warranty) or the M98 (3,660 GPH at 10 ft) if you need more.
Buy it if you are replacing the primary anyway and want one warranty, one manufacturer and app alerts without add-on modules.
Mistakes we see on homeowner installs
Backup float set too low. The backup runs every cycle, the battery is flat by the time the power fails, and the owner never knows because the charger light was green.
No check valve on the backup riser. The primary pumps into the shared pipe, the water falls back through the backup, and the primary short-cycles until it burns out. If the backup kit's instructions do not show a second check valve, add one anyway.
Check valve at the ceiling. A valve mounted on the horizontal run holds a tall column of water that slams the flapper shut on every cycle. Twelve to eighteen inches above the pump, with a union, is where it goes. Use a quiet-close spring valve under a bedroom.
Battery on the floor beside the pit. The one place guaranteed to be wet when the pit overflows.
Charger on the GFCI with the freezer. A tripped outlet is the most common reason we find a dead sump system. Follow local code on GFCI protection, give the pumps their own circuit where possible, and put a power-loss alarm on it.
Never tested with the primary unplugged. A monthly test takes four minutes with a hose. Skip it and the first real test is the storm.
When to call a pro
Call if the pit is under 16 in. and you want a backup anyway (a plumber can often upsize the basin, or install a water-powered unit that needs no pit space), if the discharge line is buried and you cannot confirm where it daylights, if the existing riser has no union and you would have to cut a pipe you cannot see the end of, if the primary is tripping breakers, or if any part of the sump system shares a circuit or a wet floor with the electrical panel. A plumber or basement waterproofer does this install in two to three hours; the quote form below reaches vetted local contractors through HelpMeNow.com.
Frequently asked questions
Can I install a battery backup sump pump myself?
Usually, yes. If the pit is 18 in. across (16 in. for a stacked combo), the primary works, and you can cut and glue 1-1/2 in. PVC, the install is three to four hours: set the backup on a stand, float 2 to 3 in. above the primary's turn-on level, its own riser with its own check valve, tie in above the primary's check valve or run a separate discharge, battery in a box off the floor, then test with the primary unplugged. Pits under 16 in., buried discharge lines you cannot trace, and electrical panels near the water are reasons to call a plumber.
Does a backup sump pump need its own check valve?
Yes, always. Without one, the primary's discharge flows backward through the idle backup pump into the pit, so the primary runs continuously and the pit never clears. Put the backup's check valve 12 to 18 in. above the pump with a union, arrow pointing away from the pump, and tee into the main discharge above the primary's check valve, or better, run a separate discharge line.
How high should the backup float be set?
Two to three inches above the primary pump's turn-on level. The backup should start only when the primary has failed or cannot keep up. Set it level with the primary and it will run on every cycle, drain the battery during normal rain and be empty when the power actually fails. Confirm the setting by unplugging the primary and filling the pit with a hose.
What battery do I need for a backup sump pump?
The group size the manufacturer specifies: Group 27 deep-cycle for the Basement Watchdog units and Liberty StormCell, Group 27, 29 or 31 for the Zoeller Aquanot Fit. AGM batteries are sealed and maintenance-free; flooded wet-cell batteries cost less but need distilled water every two to three months and vent hydrogen while charging, so the lid stays on the box. Either type lasts three to five years. Write the install date on the case and expect to replace it on schedule whether or not it ever ran a storm.
Can I connect the backup to the same discharge pipe as the primary?
Yes, if you tee in above the primary's check valve and the backup has its own check valve on its riser, so neither pump can push water back through the other. Use a wye or sanitary tee pointed in the direction of flow. A separate discharge through the rim joist is cleaner, avoids any shared restriction, and is required by some local codes; check yours.
How often should I test a battery backup sump pump?
Monthly, and before any forecast storm. Unplug the primary, fill the pit with a hose until the backup starts, confirm it pumps the pit down and alarms, then plug the primary back in and confirm the charger returns to charging. Most controllers also run an automatic weekly self-test, but that checks the circuit, not the float travel or the check valve. Replace the battery at three to five years regardless of how it tests.
DryHomeLab is written and reviewed by the team behind HelpMeNow.com, a marketplace that connects homeowners with vetted local contractors for water-damage restoration, plumbing and waterproofing. Before HelpMeNow the same team ran a 24/7 water-damage restoration company in the Seattle area; the equipment on this site is what we specified, bought and ran on real water losses. We publish the rubric behind every score.
- Ran a 24/7 water-damage restoration company, Seattle area
- Operate HelpMeNow.com, a contractor marketplace
- Publishes its scoring rubric